Blue Snowflake Hexagon Crochet Bedspread
Advanced
For experienced crocheters who enjoy complex shaping, fine detail, and ambitious construction
Multi-Day Project
A rewarding 12+ hour journey — perfect for dedicated crafters who love detailed work.
Handmade Gift
A beautiful keepsake — free forever. Read online or print at home.
 Magic ring & first rounds
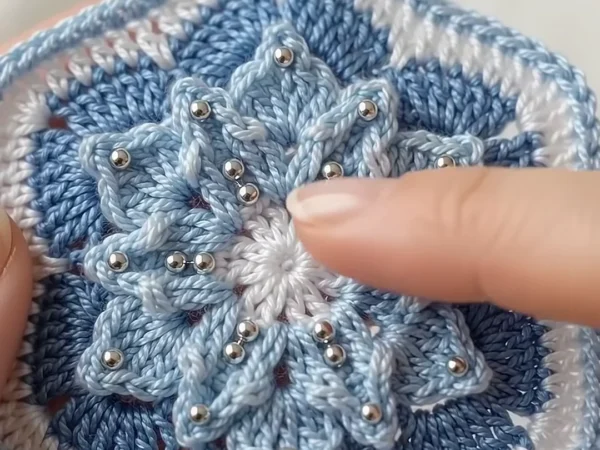 Building the shape
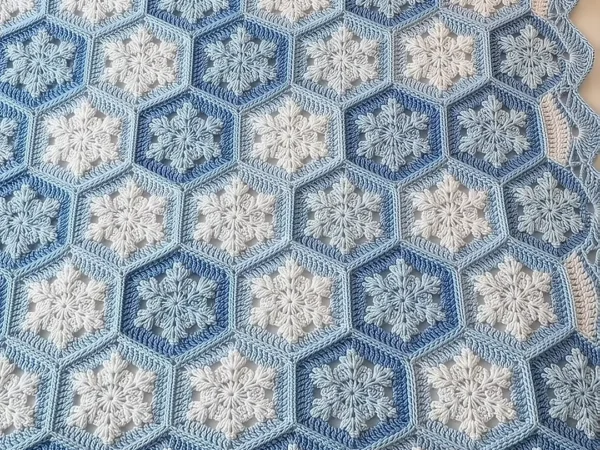 Assembly in progress
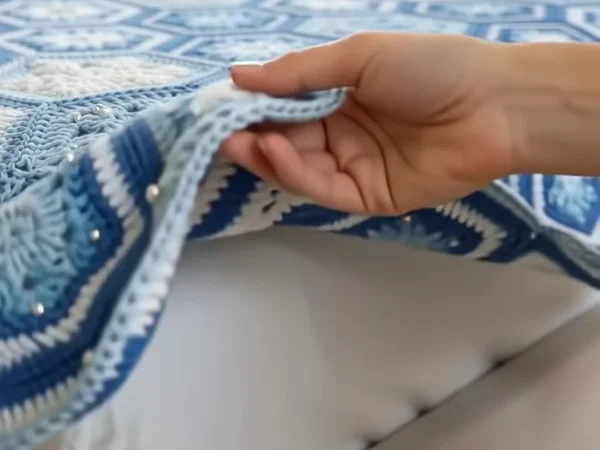 Finished & ready!
About This Blue Snowflake Hexagon Crochet Bedspread
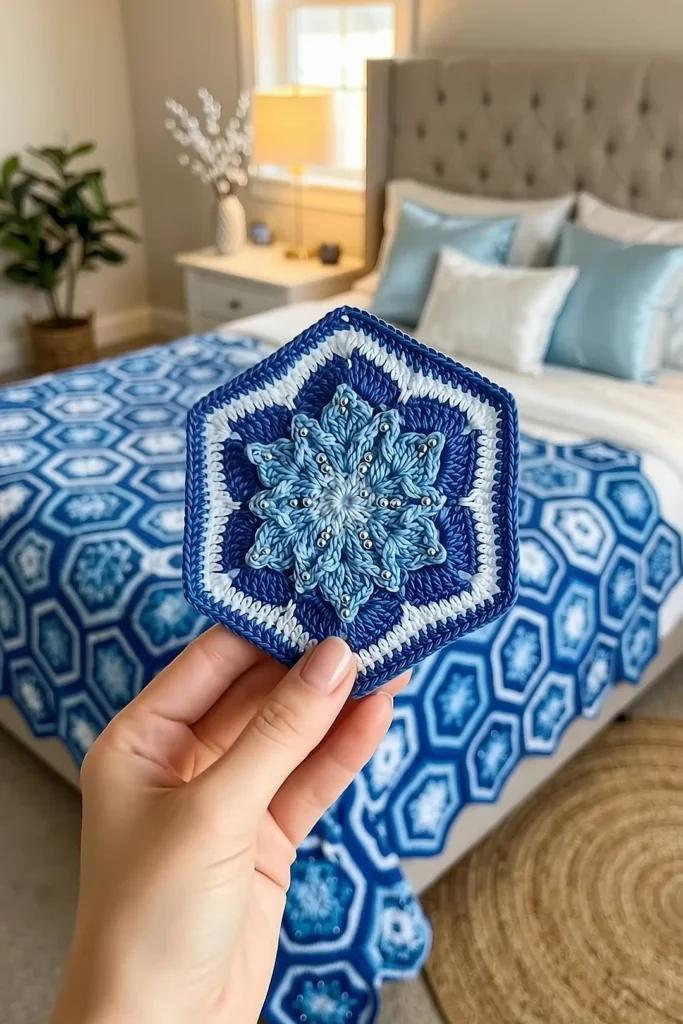
This snowflake hexagon crochet blanket pattern makes a bed look like the inside of a snow globe. Every hexagon has a raised snowflake in the middle: a small center, six short pointed petals and twelve long pointed petals on top of each other, with tiny silver beads that catch the light. Royal blue hexagons with light blue snowflakes and pale blue hexagons with white snowflakes are mixed across the bed like a honeycomb, and a light blue and white zigzag border with shells goes all around.
The snowflake is not sewn on. The two petal layers grow out of the front loops of the center rounds, and the next round goes into the back loops behind them, so the petals stand up off the hexagon by themselves. After the petals, five rounds turn the circle into a hexagon with six sharp corners: a blue background, a white ring and a light blue edge. Half hexagons fill the gaps along the long sides, so the sides come out straight, while the top and bottom keep the natural zigzag of the honeycomb.
A queen bedspread takes about 195 to 215 hours and a throw about 78 to 88 hours. One hexagon takes about 50 minutes, including the beads. This is an advanced project for a crocheter who is happy with front and back loop work, tall stitches, many color changes and a long joining step, and who wants a winter showpiece for the bedroom.
Materials
- DK weight cotton or acrylic yarn, light blue about 6,600 m for a queen (33 balls of 100 g / 200 m), or 2,720 m for a throw (14 balls)
- DK weight cotton or acrylic yarn, white about 3,750 m for a queen (19 balls), or 1,530 m for a throw (8 balls)
- DK weight cotton or acrylic yarn, royal blue about 760 m for a queen (4 balls), or 280 m for a throw (2 balls)
- 4 mm round silver-color glass beads about 3,900 for a queen, or 1,550 for a throw (18 per hexagon, plus spares)
- White sewing thread and a thin beading needle the needle must pass through the beads
- 4 mm (G-6) crochet hook for the hexagon rounds, half hexagons, joining and border
- 3.5 mm (E-4) crochet hook for the two petal rounds only
- Stitch markers, tapestry needle, blocking pins and scissors
Abbreviations
MRmagic ringchchainsl stslip stitchscsingle crochetdcdouble crochettrtreble crochet (yarn over twice)dtrdouble treble crochet (yarn over 3 times)sc2togsingle crochet 2 togetherdc3togdouble crochet 3 togetherpicotch 3, sl st in 3rd ch from hook; it makes the sharp tip of a petalFLO / BLOfront loop only / back loop onlyspspaceskskipst(s)stitch(es)rndroundreprepeatRS / WSright side / wrong sideSnowflake Center and Petals (make 77 royal and 136 pale for a queen, 28 royal and 55 pale for a throw)
- Colors: royal hexagons have a white center and light blue petals. Pale hexagons have a light blue center and white petals. Below, “center color” and “petal color” mean the colors of the version you are making.
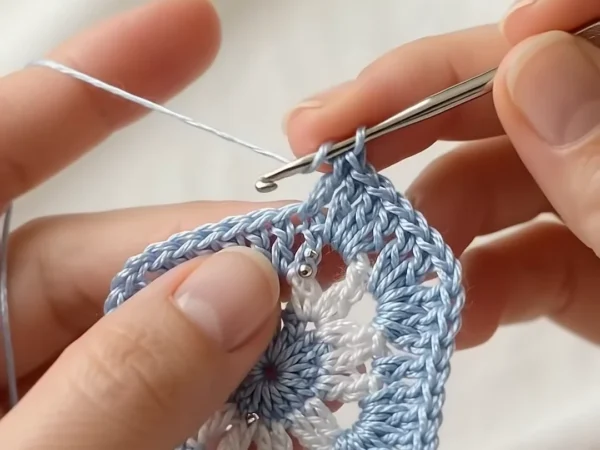
- Rnd 1: with the center color and the 4 mm hook, MR, ch 3 (counts as dc here and throughout), 11 dc in ring, join with sl st to top of ch 3. Pull the ring tight. (12 dc)
- Rnd 2: ch 1, 2 sc in each st around, join with sl st to first sc. Fasten off. (24 sc) Work this rnd through both loops; the next two rnds use its front and back loops.
- Rnd 3 (inner petals, FLO of Rnd 2): with the petal color and the 3.5 mm hook, join with sl st in FLO of any sc. Ch 1, sc in same st, (dc, tr) in FLO of next st, picot, (tr, dc) in FLO of next st, sc in FLO of next st, *sc in FLO of next st, (dc, tr) in FLO of next st, picot, (tr, dc) in FLO of next st, sc in FLO of next st; rep from * 4 more times, join with sl st to first sc. Fasten off. (6 petals, 4 sts of Rnd 2 used for each)
- Rnd 4 (base for outer petals, BLO of Rnd 2): fold the inner petals toward you. With the petal color and the 4 mm hook, join with sl st in BLO of any st of Rnd 2, behind the petals. Ch 1, sc in BLO of same st, 2 sc in BLO of next st, *sc in BLO of next st, 2 sc in BLO of next st; rep from * 10 more times, join with sl st to first sc. Do not fasten off. (36 sc)
- Rnd 5 (outer petals, FLO of Rnd 4): change to the 3.5 mm hook. *Sl st in FLO of next st, (tr, dtr, picot, dtr, tr) in FLO of next st, sl st in FLO of next st; rep from * 11 more times, working the last sl st into the joining st. Fasten off. (12 petals, 3 sts of Rnd 4 used for each)
- The 12 outer petals are longer than the 6 inner petals and sit in the gaps between them, so you see two layers of points, like a snowflake. The back loops of Rnd 4 stay free for the hexagon rounds.
Hexagon Rounds
- Colors: royal hexagons use royal blue for Rnds 6-7. Pale hexagons use light blue for Rnds 6-7. Both versions use white for Rnd 8 and light blue for Rnds 9-10, so all hexagons join with the same light blue edge.
- Rnd 6 (BLO of Rnd 4): fold the outer petals toward you. With the 4 mm hook, join with sl st in BLO of any st of Rnd 4, behind the petals. Ch 3, dc in BLO of next 4 sts, (dc, ch 2, dc) in BLO of next st, *dc in BLO of next 5 sts, (dc, ch 2, dc) in BLO of next st; rep from * 4 more times, join with sl st to top of ch 3. (42 dc: 7 per side, 6 corner ch-2 sps) The circle is now a hexagon; mark the corners.
- Rnd 7: sl st in next 5 dc and in corner ch-2 sp, ch 3, (ch 2, dc) in same sp, *dc in each dc to next corner sp, (dc, ch 2, dc) in corner sp; rep from * 4 more times, dc in each remaining dc, join to top of ch 3. Fasten off. (54 dc: 9 per side)
- Rnd 8: with white, join in any corner ch-2 sp. Ch 3, (ch 2, dc) in same sp, *dc in each dc to next corner sp, (dc, ch 2, dc) in corner sp; rep from * 4 more times, dc in each remaining dc, join. Fasten off. (66 dc: 11 per side)
- Rnd 9: with light blue, join in any corner ch-2 sp and work as Rnd 8. Do not fasten off. (78 dc: 13 per side)
- Rnd 10: sl st in corner ch-2 sp, ch 1, (sc, ch 1, sc) in same sp, *sc in each dc to next corner sp, (sc, ch 1, sc) in corner sp; rep from * 4 more times, sc in each remaining dc, join with sl st to first sc. Fasten off. (90 sc: 15 per side, counting the corner sc at each end, and 6 corner ch-1 sps)
- The petals cover most of Rnds 6 and 7, so the deep color shows as a frame around the snowflake. Block the hexagon to 16 cm flat side to flat side, with the petals lifted up.
Silver Beads
- Each hexagon gets 18 beads: 1 bead just below the picot of each of the 12 outer petals and 1 bead just below the picot of each of the 6 inner petals.
- Thread the beading needle with doubled white sewing thread and knot the end. Start on the WS of an outer petal, so the knot hides under the petal.
- Bring the needle up through the petal, pick up a bead, and go back down through the petal right next to where you came up. Go through the bead a second time so it sits straight.
- Travel to the next petal on the WS of the petals, through the stitches of the petals only. Never sew through the hexagon behind them, or the petals will be flattened.
- Knot the thread on the WS of the last petal and hide the end inside the petal.
Half Hexagons (make 16 for a queen, 10 for a throw)
- The half hexagons are plain, with no snowflake, so the straight edges stay flat. Work in rows with the 4 mm hook and turn at the end of every row. Rows 1-4 are light blue, Row 5 is white and Rows 6-7 are light blue, so the white line matches the white rnd of the full hexagons.
- Row 1: with light blue, MR, ch 3 (counts as dc here and throughout), 2 dc in ring, (ch 2, 3 dc in ring) 2 times. Pull the ring closed, but not so tight that the row curls. Turn. (9 dc in 3 sides of 3, 2 ch-2 sps)
- Row 2: ch 3, dc in same st at the base of the ch 3, dc in next 2 dc, (dc, ch 2, dc) in ch-2 sp, dc in next 3 dc, (dc, ch 2, dc) in ch-2 sp, dc in next 2 dc, 2 dc in top of ch 3. Turn. (15 dc: 5 per side)
- Row 3: ch 3, dc in same st, dc in each dc to next ch-2 sp, (dc, ch 2, dc) in sp, dc in each dc to next ch-2 sp, (dc, ch 2, dc) in sp, dc in each dc to the turning ch, 2 dc in top of ch 3. Turn. (21 dc: 7 per side)
- Row 4: rep Row 3. Fasten off. (27 dc: 9 per side)
- Row 5: turn, join white in the first st and rep Row 3. Fasten off. (33 dc: 11 per side)
- Row 6: turn, join light blue in the first st and rep Row 3. Turn. (39 dc: 13 per side)
- Row 7: ch 1, 2 sc in first dc, sc in each dc to next ch-2 sp, (sc, ch 1, sc) in sp, sc in each dc to next ch-2 sp, (sc, ch 1, sc) in sp, sc in each dc to the turning ch, 2 sc in top of ch 3. Fasten off. (45 sc: 15 per side, 2 ch-1 sps)
- The 3 sides of 15 sc match the sides of a full hexagon. The row ends form the straight edge, which goes on the outside of the blanket.
Layout and Joining
- Lay the hexagons with one point at the top and one at the bottom, so each has a straight side on the left and on the right. The rows go across the width of the bed.
- Queen (about 217 x 249 cm with the border): 17 rows. Rows 1, 3, 5… 17 have 13 hexagons. Rows 2, 4, 6… 16 have 12 hexagons, moved half a hexagon to the right, with a half hexagon at each end. (9 x 13 + 8 x 12 = 213 hexagons and 16 half hexagons)
- Throw (about 137 x 166 cm with the border): 11 rows. Rows 1, 3… 11 have 8 hexagons. Rows 2, 4… 10 have 7 hexagons and a half hexagon at each end. (6 x 8 + 5 x 7 = 83 hexagons and 10 half hexagons)
- Color order (R = royal, P = pale): every odd row goes R, P, P, R, P, P… from the left. Every even row goes P, R, P, P, R, P… from the left. This way a royal hexagon never touches another royal hexagon, and about one in three hexagons is royal, like in the photos. (Queen: 77 royal, 136 pale. Throw: 28 royal, 55 pale.)
- Join method: hold two hexagons WS together with the edges matched. With light blue and the 4 mm hook, sl st in the corner ch-1 sps of both pieces, sl st through the BLO of both pieces in each of the next 15 sc, then sl st in the next corner ch-1 sps. (17 sl st per side) The front loops stay on top as a fine raised line, which outlines every hexagon on the RS.
- Join the hexagons of each row along their straight sides first. Then join each row to the next in one long zigzag seam, turning at every corner. Where three hexagons meet, work the sl st through all three corner sps so no hole is left.
- Set a half hexagon into the gap at each end of the short rows: join its middle side to the straight side of the end hexagon, and its two slanted sides to the hexagons above and below, with the same 17 sl st per side. The row ends of the half face out and make the long sides of the blanket straight.
Zigzag Border
- The top and bottom edges are zigzags: a “peak” is the free point of a hexagon, and a “valley” is where two hexagons meet. The 4 corners of the blanket are worked like peaks. The long sides are straight.
- Rnd 1: with light blue and the 4 mm hook, RS facing, join in a corner of the blanket. Ch 1. Along the zigzag edges: (sc, ch 2, sc) in the ch-1 sp of each peak and blanket corner, sc in each of the 15 sc of each side, and sc2tog at each valley, working one leg in the corner ch-1 sp of each of the two hexagons. Along the long sides: sc in each of the 15 sc of each hexagon side, 1 sc in each place where a hexagon meets a half hexagon, and 25 sc along the straight edge of each half hexagon (2 sc in each dc row end and 1 sc in the ring). Join.
- Check Rnd 1: a queen has 353 sc on each long side between the corner ch-2 sps. For a throw, work 27 sc instead of 25 on the middle half hexagon of each long side, to get 229 sc. Each side from a valley to the next peak has 16 sts plus the shared sc2tog.
- Rnd 2: with white, join in a corner ch-2 sp. Ch 3, (ch 2, dc) in same sp. Then work around the whole blanket: dc in each st, (dc, ch 2, dc) in each ch-2 sp, and at each valley dc3tog over the st before the sc2tog, the sc2tog and the st after it. Join to top of ch 3. Fasten off. (Each valley-to-peak side stays at 16 sts; each long side grows by 2, to 355 dc on a queen and 231 on a throw)
- Rnd 3: with light blue, join in a corner ch-2 sp and work as Rnd 2. Do not fasten off. (357 sts on each queen long side, 233 on each throw long side)
- Rnd 4 (shells): sl st in the corner ch-2 sp, ch 3, (2 dc, ch 2, 3 dc) in same sp, sc in next st, *(sk next st, 5 dc in next st, sk next st, sc in next st) to the next ch-2 sp, (3 dc, ch 2, 3 dc) in the ch-2 sp, sc in next st*; rep from * around, leaving out the last shell and sc, and join with sl st to top of ch 3. Fasten off.
- Check Rnd 4: between two ch-2 sps there is always a multiple of 4 plus 1 sts, so the shells come out even. A valley-to-valley section across a peak has 8 shells, the first and last sides at each corner have 5 shells, and each long side has 89 shells on a queen and 58 on a throw.
Finishing
Weave in every tail on the WS, inside the stitches of its own color. The center and petal tails are short, so weave them through the back of Rnd 4 and Rnd 6, never through the petals, or the petals will stop standing up.
Lay the blanket flat RS up, mist it with water and pin out each peak of the zigzag border and each corner shell. Lift every petal with your fingers so the snowflakes stand up, and do not press or iron them. Let it dry completely before you move it.
Tips for Success
- Work in batches: make all the centers and petals of one version first, then all the hexagon rounds, then sew the beads on 20 hexagons at a time.
- Use stitch markers in the 6 corners of Rnd 6. Every later rnd starts from those corners, and they keep the hexagon sharp.
- Change to the smaller hook for Rnds 3 and 5 only. The firmer petals keep their pointed tips after washing.
- Lay out the full blanket on the floor before joining and take a photo. It is easy to put two royal hexagons side by side by mistake.
- Weave in the ends of each hexagon as soon as it is done. With 12 tails per hexagon, a queen has more than 2,500 ends.
Common Mistakes to Avoid
- Flat petals. Rnd 3 goes in the front loops of Rnd 2 and Rnd 4 in the back loops. If you use both loops for the petals, there is no room for the next layer.
- A hexagon that ruffles. The corners use (dc, ch 2, dc), which adds only 2 sts to each side per rnd. Working (2 dc, ch 2, 2 dc) adds too many and the hexagon waves.
- Corners in the wrong place. Rnd 6 needs exactly 36 sts in Rnd 4. Count them before you start, or the 6 corners will not be evenly spaced.
- Beads sewn through the background. This pins the petals down. Sew only through the petals and travel between them on their WS.
- A border that pulls or waves. Count Rnd 1 on each long side before going on. If the shells in Rnd 4 do not come out even, the count in Rnd 1 was off.
Ways to Customize This Pattern
- Make an ice version with only pale hexagons and white snowflakes, and use royal blue only for the border.
- Change the blues to lilac and silver gray, or to mint and white, for a softer snow globe look.
- Make a child blanket of 18 hexagons and 4 half hexagons (rows of 4, 3, 4, 3, 4), about 73 x 83 cm, and leave out the beads. Add a white French knot at each petal tip instead.
- Make a set of cushions: 7 hexagons (1 in the middle and 6 around it) make a round cushion front of about 48 cm.
- Add one more white rnd before the light blue edge for bigger hexagons of about 18.5 cm, so you need fewer of them. Add one more dc row to the half hexagons too.
Frequently asked questions
A queen bedspread needs 213 hexagons (77 royal and 136 pale) and 16 half hexagons. A throw needs 83 hexagons (28 royal and 55 pale) and 10 half hexagons.
About 42 m in total. A royal hexagon uses about 25 m light blue, 9 m royal blue and 8 m white. A pale hexagon uses about 23 m light blue and 19 m white.
Yes. The snowflakes stand up without them. You can replace each bead with a French knot in white or silver yarn, which is also safer for small children and pets.
Yes. On Rnd 10 of each new hexagon, replace the ch 1 at each shared corner and every third sc along a shared side with a sl st into the neighboring hexagon. You lose the raised line between the hexagons, but you skip the long joining step.
Wash it on a gentle cold cycle inside a large laundry bag, or by hand, and dry it flat. Then lift the petals with your fingers. Wash a scrap of royal blue with white first to check that the color does not bleed.