Burgundy and Blush Spiral Crochet Bedspread
Advanced
For experienced crocheters who enjoy complex shaping, fine detail, and ambitious construction
Weekend Project
A satisfying weekend make — start Friday, finish Sunday, enjoy forever.
Handmade Gift
A beautiful keepsake — free forever. Read online or print at home.
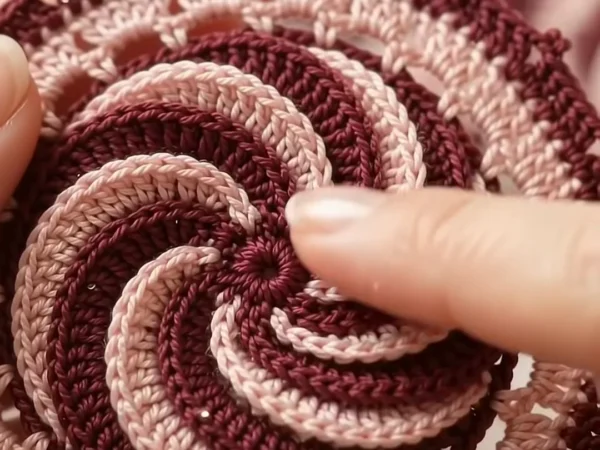
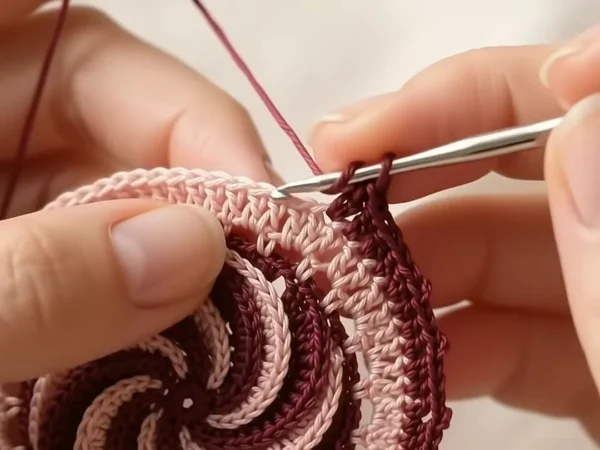 Magic ring & first rounds
 Building the shape
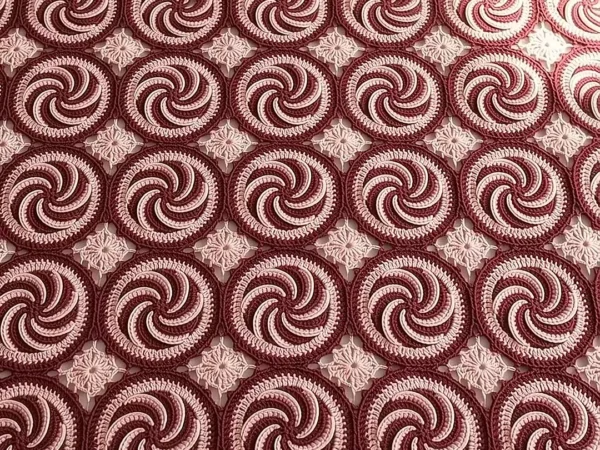 Assembly in progress
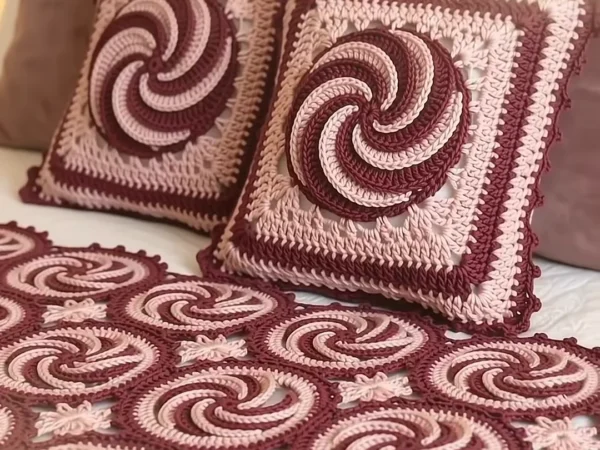 Finished & ready!
About This Burgundy and Blush Spiral Crochet Bedspread
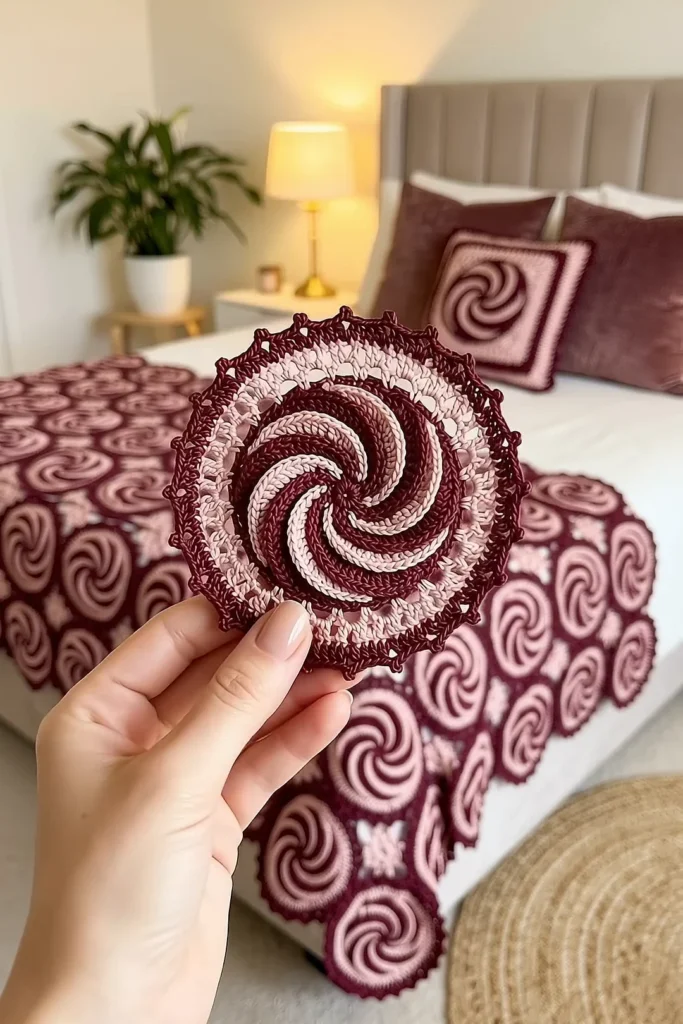
This two color spiral crochet bedspread pattern is built from round medallions with a thick, raised spiral in the middle. Six stripes, three burgundy and three blush, curl out from the center like a spinning top. The spiral is not embroidered or sewn on: six yarns are worked at the same time, and each one climbs over the stripe before it, so the ridges stand up and you can feel them with your fingers.
Around the spiral, each medallion gets a solid blush round, a lacy blush round with small windows and a burgundy edge of picot scallops. The medallions are joined in a straight grid at their picots, and a small blush four-petal lace flower fills every gap between four circles. A burgundy picot border follows the curves of the outer circles, and a matching square cushion uses one big spiral framed with blush and burgundy rounds.
A queen bedspread takes about 145 to 160 hours and a throw about 55 to 62. One medallion takes about 55 minutes, and one gap flower about 10 minutes. This is an advanced project for a crocheter who is not afraid of several balls of yarn at once and who likes to count stitches carefully.
Materials
- DK weight cotton yarn, burgundy about 2,050 m for a queen (11 balls of 100 g / 200 m), or 810 m for a throw (5 balls)
- DK weight cotton yarn, blush pink about 2,050 m for a queen (11 balls), or 760 m for a throw (4 balls)
- Extra yarn for 2 cushions about 120 m burgundy (1 ball) and 420 m blush (3 balls)
- 4 mm (G-6) crochet hook for the medallions, flowers, joining, border and cushions
- 2 cushion inserts 35 x 35 cm
- 6 small yarn bobbins or zip bags to keep the six spiral strands apart
- 6 locking stitch markers, tapestry needle and scissors
Abbreviations
MRmagic ringchchainsl stslip stitchscsingle crochethdchalf double crochetdcdouble crochettrtreble crochetBLOback loop onlypicotch 3, sl st in 3rd ch from hookspspaceskskipst(s)stitch(es)rndroundreprepeatRS / WSright side / wrong sideSix-Strand Spiral Center (make 110 for a queen, 42 for a throw)
- Pass 1 (set-up): with strand 1 (burgundy), MR, ch 3 (counts as dc), 1 dc in ring. Put the live loop on a marker. With strand 2 (blush), pull up a loop in the ring, ch 3, 1 dc in ring, put the loop on a marker. Work strands 3, 4, 5 and 6 the same way, each next to the one before, alternating burgundy and blush. Pull the ring tight. (2 sts per strand, 12 sts in total, 6 live loops)
- From now on work every pass in BLO with the RS facing you. The free front loops make the raised line along the edge of each stripe.
- Pass 2: pick up strand 1. Work 2 dc in each of the next 2 sts (these belong to strand 2) and stop in front of the live loop of strand 2. Put strand 1 back on its marker. Pick up strand 2 and work the same into the 2 sts of strand 3. Rep with strands 3, 4, 5 and 6; strand 6 works into the sts of strand 1. (4 sts per strand, 24 sts in total)
- Pass 3: with each strand in turn, (dc in next st, 2 dc in next st) twice. (6 sts per strand, 36 sts)
- Pass 4: with each strand in turn, (dc in next 2 sts, 2 dc in next st) twice. (8 sts per strand, 48 sts)
- Pass 5: with each strand in turn, (dc in next 3 sts, 2 dc in next st) twice. (10 sts per strand, 60 sts)
- Pass 6: with each strand in turn, (dc in next 4 sts, 2 dc in next st) twice. (12 sts per strand, 72 sts)
- Pass 7 (leveling pass): this pass makes the edge flat. With each strand in turn, work over the 12 sts in front of it: dc in next 2 sts, 2 dc in next st, dc in next 2 sts, 2 hdc in next st, hdc in next 2 sts, sc in next 2 sts, sl st in next 2 sts. Fasten off that strand with a 15 cm tail before you pick up the next one. (14 sts per strand, 84 sts in total)
- Check: you now have 6 stripes that curl from the center out, each one lying on top of the stripe behind it. The spiral is about 13 cm across.
Lace Rounds and Picot Edge
- Rnd A (blush, solid): join blush with a sl st in the first sc of any strand’s leveling pass. Ch 3 (counts as dc), dc in next 5 sts, 2 dc in next st, *dc in next 6 sts, 2 dc in next st; rep from * 10 more times, join with sl st to top of ch 3. Work into the sl sts of the leveling pass like any other st. (96 dc)
- Rnd B (blush, windows): ch 3, dc in next 2 sts, ch 2, sk next st, *dc in next 3 sts, ch 2, sk next st; rep from * 22 more times, join. Fasten off. (72 dc and 24 ch-2 windows)
- Rnd C (burgundy): join burgundy in any ch-2 sp. Ch 3, dc in same sp, *dc in next 3 dc, 2 dc in next ch-2 sp; rep from * 22 more times, dc in last 3 dc, join. (120 dc)
- Place a marker in the top of the ch 3. This is where Rnd D starts, and it marks scallop 1.
- Rnd D (burgundy, picot scallops): ch 1, *sc in next st, hdc in next st, (dc, picot, dc) in next st, hdc in next st, sc in next st; rep from * 23 more times, join to first sc. Fasten off. (24 scallops, each 6 sts and 1 picot) Work Rnd D with join-as-you-go for all medallions after the first one (see Joining).
- Number the scallops 1 to 24 in the order you made them. Scallops 1-2, 7-8, 13-14 and 19-20 are the joining scallops, one pair on each side. The 4 scallops between each pair stay free for the gap flowers and the border.
- Block each medallion to a 20 cm circle.
Joining the Medallions
- Layout: 10 x 11 = 110 medallions for a queen (about 206 x 226 cm with the border), or 6 x 7 = 42 for a throw (about 126 x 146 cm).
- Lay every medallion with scallop 1 pointing in the same direction (for example to the right), so the joining pairs always face each other and every spiral turns the same way.
- Make the first medallion with a plain Rnd D. Work Rnd D of each new medallion as usual until you reach a joining scallop that faces a finished neighbor.
- Joined scallop: sc in next st, hdc in next st, dc in next st, ch 1, sl st in the picot of the matching neighbor scallop, ch 1, dc in same st as the last dc, hdc in next st, sc in next st. This replaces the picot. Join the second scallop of the pair the same way to the second matching picot.
- A new medallion joins to 1 neighbor in the first row (2 joined picots) and to 2 neighbors in every other row (4 joined picots: one pair to the left, one pair above). The pairs join in mirror order, for example scallop 13 to the neighbor’s scallop 2 and scallop 14 to the neighbor’s scallop 1.
- When all medallions are joined, every gap between 4 circles is a curved diamond with 4 free scallops of each circle around it. That makes 9 x 10 = 90 gaps on a queen and 5 x 6 = 30 gaps on a throw.
Blush Gap Flowers (make 90 for a queen, 30 for a throw)
- Rnd 1: with blush, MR, ch 1, 8 sc in ring, join with sl st to first sc. Pull tight. (8 sc)
- Rnd 2: ch 1, *sc in next st, ch 3, sk next st; rep from * 3 more times, join. (4 sc and 4 ch-3 sps)
- Rnd 3 (petals, joined to the medallions): turn the flower so each ch-3 sp points to the middle of one circle. In the first ch-3 sp work (sc, hdc, 2 dc, ch 1), sl st in the 2nd free picot of the circle it faces, ch 2, sl st in the 3rd free picot of the same circle, ch 1, then (2 dc, hdc, sc) in the same ch-3 sp. Sl st in the next sc of Rnd 2. Rep in the other 3 ch-3 sps, joining each petal to the next circle. Join and fasten off. (4 petals, 8 joins in total)
- The 1st and 4th free picots of each circle stay open beside the petals, which gives the light lace look around each flower.
Burgundy Picot Border
- Count the free picots on the outer circles: a side circle has 10 free picots on the outside (its outer joining pair plus the 4 free picots on each side of it), and a corner circle has 16.
- Rnd 1: with burgundy, join with sc in the first outside picot of a corner circle. *Ch 4, sc in next outside picot; rep from * to the last outside picot of that circle. Then ch 2 and sc in the first outside picot of the next circle across the dip. Rep around the whole bedspread. Join. (Queen: 366 ch-4 loops and 38 ch-2 dips; throw: 222 ch-4 loops and 22 ch-2 dips)
- Rnd 2: sl st into the first ch-4 loop. *(sc, hdc, dc, picot, dc, hdc, sc) in each ch-4 loop of the circle, sl st in the ch-2 dip; rep from * around. Join and fasten off. (Queen: 366 picot scallops; throw: 222)
- The dips stay tight, so the edge follows the round shape of each circle, the same way you see in the photos.
Matching Square Cushion (make 2)
- Spiral: work Passes 1 to 6 as for the medallion. Pass 7: with each strand in turn, (dc in next 5 sts, 2 dc in next st) twice. (14 sts per strand, 84 sts) Pass 8 (leveling): with each strand in turn, dc in next 2 sts, 2 dc in next st, dc in next 3 sts, 2 hdc in next st, hdc in next 3 sts, sc in next 2 sts, sl st in next 2 sts, fasten off. (16 sts per strand, 96 sts)
- Rnd A (blush, squaring): join blush in any st. Ch 4 (counts as tr), (tr, ch 2, 2 tr) in same st, *tr in next 2 sts, dc in next 3 sts, hdc in next 3 sts, sc in next 7 sts, hdc in next 3 sts, dc in next 3 sts, tr in next 2 sts**, (2 tr, ch 2, 2 tr) in next st; rep from * 2 more times, ending last rep at **, join. (108 sts: 27 per side between the corner sps, 4 corner ch-2 sps)
- Rnd B (blush, lace): sl st in next tr and in corner sp, ch 3, (dc, ch 2, 2 dc) in same sp, *sk next st, (3 dc in next st, sk next 2 sts) 8 times, 3 dc in next st, sk next st, (2 dc, ch 2, 2 dc) in corner sp; rep from * 2 more times, then work the last side the same and join. (9 groups per side; 31 dc per side counting the corner dc)
- Rnd C (burgundy): join burgundy in a corner sp. Ch 3, (dc, ch 2, 2 dc) in same sp, *dc in each dc to next corner, (2 dc, ch 2, 2 dc) in corner sp; rep from * 2 more times, dc in each remaining dc, join. Fasten off. (35 dc per side)
- Rnd D (blush): work as Rnd C. (39 dc per side) Rnd E (burgundy): as Rnd C. (43 dc per side) Rnd F (blush): as Rnd C. (47 dc per side)
- Rnd G (blush): ch 1, sc in each dc around, 3 sc in each corner sp, join. Fasten off. (49 sc per side, counting the corner sc at each end) The front is about 35 x 35 cm.
- Back: with blush, MR, ch 3, 2 dc in ring, ch 2, (3 dc, ch 2) 3 times, join. (3 dc per side) Work as Rnd C in blush only, starting each rnd with sl st in next 2 dc and in the corner sp, until the back has 47 dc per side (12 rnds), then work Rnd G. (49 sc per side)
- Joining and stuffing: hold front and back WS together with burgundy. Work through both layers: ch 1, sc in a corner sc, *(picot, sc in next 4 sts) 12 times; rep from * 3 more times, but on the last side work the last rep as picot, sc in next 3 sts, so you do not work the first corner twice. Before you close the last side, put in the 35 cm cushion insert, then join to the first sc and fasten off. (48 picots in total, 12 per side)
Finishing
The spiral leaves 6 tails at the end of the leveling pass. Weave each one into the back of its own stripe, burgundy into burgundy and blush into blush, so no color shows through on the RS. Weave the lace tails into the solid dc of Rnd A or Rnd C, never across the windows.
Lay the bedspread flat RS up and mist it with water. Pin each medallion into a round shape and pin out the border scallops. Push the spiral ridges up with your fingers so they stand out, and do not press them flat. Let it dry completely before you move it.
Tips for Success
- Number your 6 small balls 1 to 6 with tape and keep them in a row in a box, in the same order as the strands on the work.
- After each pass, count the sts of one strand only. If one strand is right, the others usually are too.
- Work the spirals for all medallions first, then do all the blush rounds, then all the burgundy rounds. You change color less often.
- Keep the same tension on all 6 strands. A loose strand makes a flat, wide stripe that breaks the spiral.
- Join the gap flowers only after a full row of medallions below and above is finished, so the gap is the right shape.
Common Mistakes to Avoid
- Working over a live loop. Each strand must stop as soon as it reaches the next loop. If you work past it, the next strand has nowhere to go and the spiral breaks.
- Working the strands in the wrong order. Always pick up the strand that sits furthest back, the one whose stitches are lowest.
- Forgetting the leveling pass. Without it the medallion has 6 steps on the edge and Rnd A will wave up and down.
- The wrong number of windows. Rnd A must have 96 dc to give 24 windows in Rnd B and 24 scallops in Rnd D. Count Rnd A before you go on.
- Turning medallions while joining. If scallop 1 does not point the same way on every medallion, the joining pairs will not line up and the gaps will be uneven.
Ways to Customize This Pattern
- Use 3 colors: burgundy, blush and cream, two strands of each, for a softer spiral.
- Make a 4-strand spiral (2 burgundy, 2 blush) with wider stripes: start with 3 dc per strand and add 3 sts per strand in every pass, so each pass still adds 12 sts and the totals stay the same.
- Make a table runner of 3 x 8 medallions with gap flowers, about 66 x 166 cm with the border.
- Use navy and sky blue, or forest green and mint, for a cooler bedspread with the same shape.
- Make single medallions without the joining as coasters or a set of round placemats with an extra blush round.
Frequently asked questions
All six strands are attached at the start and stay attached. You work one strand at a time, each one over the stitches of the strand in front of it, then drop it and pick up the next. Because every stripe climbs on top of the one before, the stripes curl into a spiral and stand up as ridges.
They twist a little after each pass. Turn the medallion back the other way after every pass, or keep each ball in its own small bag, and the strands stay easy to manage.
A queen needs 110 medallions in a 10 x 11 grid and 90 gap flowers. A throw needs 42 medallions in a 6 x 7 grid and 30 gap flowers. Each cushion uses one large spiral front and one blush back.
Cotton keeps the spiral ridges sharp and the picots crisp. Acrylic makes a softer but flatter spiral, and the lace windows can close up after washing.
Wash it on a gentle cold cycle inside a large laundry bag and dry it flat. Wash a scrap of burgundy with blush first, so you know the dark color will not bleed onto the pale pink.