Fluffy Coral 3D Peony Crochet Bedspread
Advanced
For experienced crocheters who enjoy complex shaping, fine detail, and ambitious construction
Multi-Day Project
A rewarding 12+ hour journey — perfect for dedicated crafters who love detailed work.
Handmade Gift
A beautiful keepsake — free forever. Read online or print at home.
 Magic ring & first rounds
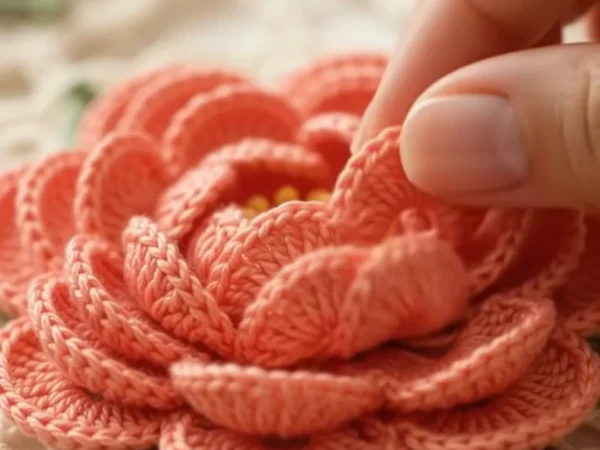 Building the shape
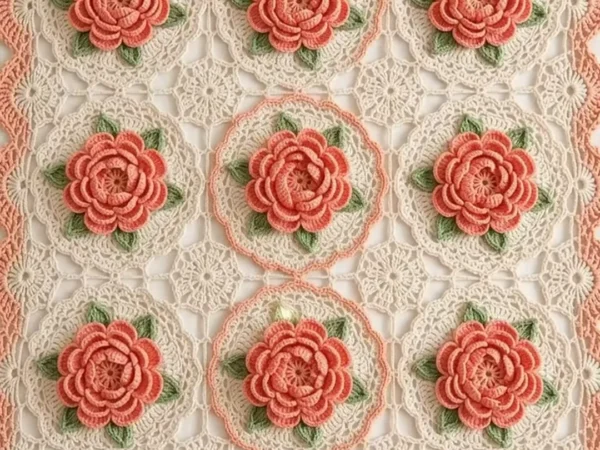 Assembly in progress
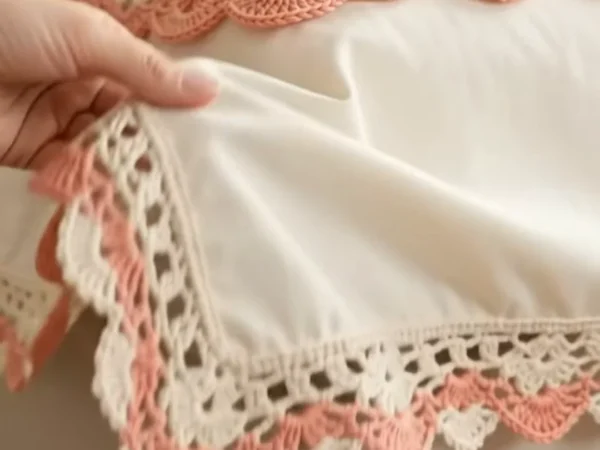 Finished & ready!
About This Fluffy Coral 3D Peony Crochet Bedspread
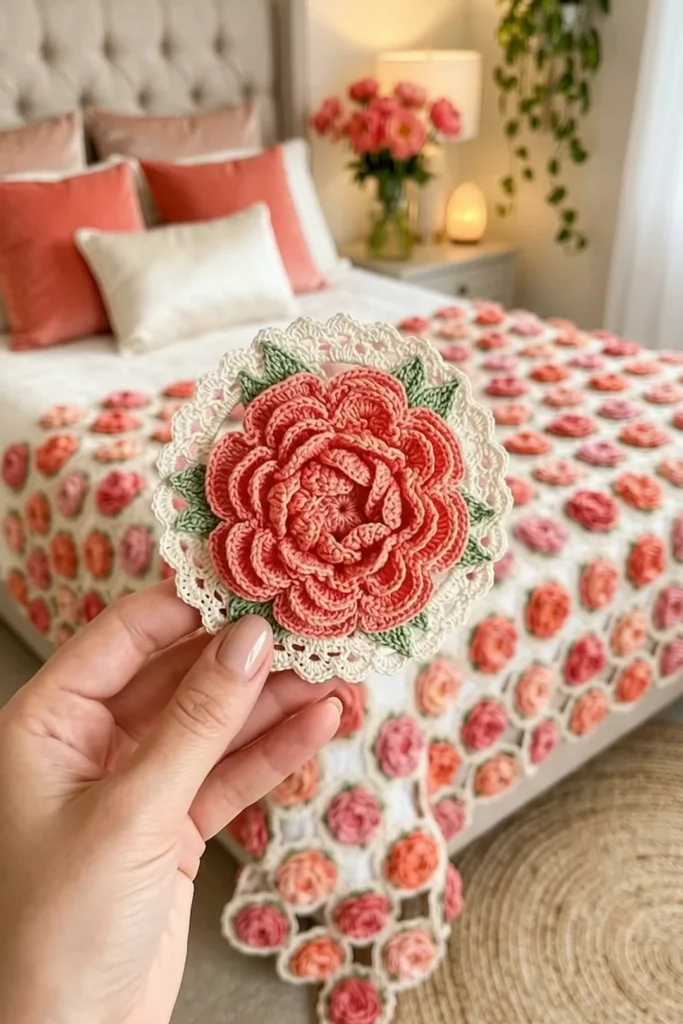
This peony crochet blanket pattern turns a plain bed into a soft garden of big coral flowers. Every motif is a round cream lace medallion with a fluffy 3D peony sewn in the middle. The peony has five layers of cupped petals: small upright ones in the center and wide open ones at the outside. A ring of yellow loops sits deep in the flower, and five sage green leaves peek out between the petals and the lace.
The medallions are joined as you go through their picot edge, so there is no sewing between them. Small round lace fillers close the gaps between four medallions, and half and quarter fillers straighten the edges. Some medallions get a thin coral ring for a little extra color. The border is a band of cream filet mesh, a coral line, coral scallops and a fine cream picot edge.
A queen bedspread takes about 230 to 250 hours and a throw about 105 to 115 hours. One medallion with its peony and leaves takes about 85 minutes. This is an advanced project for a crocheter who is happy with lace rounds, front and back loop work and a lot of small pieces. If you love texture you can touch, this is the blanket for you.
Materials
- DK weight cotton yarn, cream about 2,600 m for a queen (13 balls of 100 g / 200 m), or 1,200 m for a throw (6 balls)
- DK weight cotton yarn, coral about 2,100 m for a queen (11 balls), or 960 m for a throw (5 balls)
- DK weight cotton yarn, sage green about 470 m for a queen (3 balls), or 210 m for a throw (2 balls)
- DK weight cotton yarn, soft yellow about 160 m for a queen (1 ball), or 70 m for a throw (1 ball)
- 4 mm (G-6) crochet hook for the medallions, fillers and border
- 3.5 mm (E-4) crochet hook for the peonies and leaves
- Stitch markers, sewing pins, tapestry needle and scissors
Abbreviations
MRmagic ringchchainsl stslip stitchscsingle crochethdchalf double crochetdcdouble crochettrtreble crochetFLO / BLOfront loop only / back loop onlypicotch 3, sl st in 3rd ch from hookjoining picotch 1, sl st in the picot of the other piece, ch 1, sl st in the base of the first chsurface sl stwith the yarn held behind the work, insert the hook from the front, pull up a loop and draw it through the loop on the hookspspaceskskipst(s)stitch(es)rndroundreprepeatRS / WSright side / wrong sideLace Medallion (make 143 for a queen, 63 for a throw)
- Rnd 1: with cream and the 4 mm hook, MR, ch 3 (counts as dc here and throughout), 15 dc in ring, join with sl st to top of ch 3. Pull the ring tight. (16 dc)
- Rnd 2: ch 3, dc in same st, 2 dc in each dc around, join. (32 dc)
- Rnd 3: ch 3, dc in next dc, ch 2, *dc in next 2 dc, ch 2; rep from * 14 more times, join. (32 dc, 16 ch-2 sps)
- Rnd 4: sl st in next dc and in next ch-2 sp, ch 3, 2 dc in same sp, ch 3, *3 dc in next ch-2 sp, ch 3; rep from * 14 more times, join. (48 dc, 16 ch-3 sps)
- Rnd 5: sl st in next 2 dc and in next ch-3 sp, ch 1, sc in same sp, ch 5, *sc in next ch-3 sp, ch 5; rep from * 14 more times, join with sl st to first sc. (16 sc, 16 ch-5 loops)
- Rnd 6: sl st in next ch-5 loop, ch 3, 4 dc in same loop, ch 2, *5 dc in next loop, ch 2; rep from * 14 more times, join. (80 dc, 16 ch-2 sps)
- Coral ring (B medallions only): with RS facing, coral and the 4 mm hook, work surface sl st in a circle across the middle of Rnd 6: 1 sl st through the middle of each dc and 2 sl st across each ch-2 sp. Join and fasten off. (112 sl st) A medallions skip this step.
- Rnd 7 (scallop edge): with cream, sl st in next 4 dc and in next ch-2 sp, ch 1, sc in same sp, *sk 2 dc, (2 dc, picot, 2 dc) in next dc, sk 2 dc, sc in next ch-2 sp; rep from * 15 more times, but end the last rep with sl st in first sc instead of sc. Fasten off. (16 scallops: 64 dc, 16 sc, 16 picots)
- Number the picots 1 to 16 in the order you make them. Picots 1, 5, 9 and 13 are the joining picots for the other medallions. Picots 3, 7, 11 and 15 join to the fillers. The rest stay free.
- The first medallion is worked as above. From the second one on, work Rnd 7 as a joining round (see Joining the Medallions).
Coral Peony (make 143 for a queen, 63 for a throw)
- Rnd 1: with coral and the 3.5 mm hook, MR, ch 1, 8 sc in ring, join with sl st to first sc. Pull tight. (8 sc)
- Rnd 2 (BLO): ch 1, 2 sc in BLO of each st around, join. (16 sc)
- Rnd 3 (BLO): ch 1, *sc in BLO of next st, 2 sc in BLO of next st; rep from * 7 more times, join. (24 sc)
- Rnd 4 (BLO): ch 1, *sc in BLO of next 2 sts, 2 sc in BLO of next st; rep from * 7 more times, join. (32 sc)
- Rnd 5 (BLO): ch 1, *sc in BLO of next 3 sts, 2 sc in BLO of next st; rep from * 7 more times, join. (40 sc)
- Rnd 6 (BLO): ch 1, *sc in BLO of next 4 sts, 2 sc in BLO of next st; rep from * 7 more times, join. (48 sc) This flat disc is the base of the flower. The free front loops of Rnds 1 to 5 now sit in rings on the RS.
- Layer A (outer petals, both loops of Rnd 6): *sc in next st, (hdc, dc) in next st, 3 tr in next st, 3 tr in next st, (dc, hdc) in next st, sc in next st; rep from * 7 more times, join. Fasten off. (8 petals of 12 sts = 96 sts)
- Layer B (FLO of Rnd 5): join coral in any free front loop of Rnd 5. *Sc in next st, (hdc, dc) in next st, 3 tr in next st, (dc, hdc) in next st, sc in next st; rep from * 7 more times, join. Fasten off. (8 petals of 9 sts = 72 sts)
- Layer C (FLO of Rnd 4): join coral in any free front loop of Rnd 4. *Sc in next st, (hdc, 2 dc) in next st, (2 dc, hdc) in next st, sc in next st; rep from * 7 more times, join. Fasten off. (8 petals of 8 sts = 64 sts)
- Layer D (FLO of Rnd 3): join coral in any free front loop of Rnd 3. *Sc in next st, (hdc, dc) in next st, (dc, hdc) in next st, sc in next st; rep from * 5 more times, join. Fasten off. (6 petals of 6 sts = 36 sts)
- Layer E (FLO of Rnd 2): join coral in any free front loop of Rnd 2. *Sc in next st, 2 dc in next st, 2 dc in next st, sc in next st; rep from * 3 more times, join. Fasten off. (4 petals of 6 sts = 24 sts) These small petals stand up and close around the center.
- Stamens (FLO of Rnd 1): join yellow in any free front loop of Rnd 1. *Ch 4, sl st in next front loop; rep from * 7 more times, working the last sl st in the first loop. Fasten off. (8 yellow loops) For a fuller center, add 2 or 3 yellow French knots between the loops.
- Cup the petals with your fingers: push the inner layers up and curl the outer petals slightly forward. Leave a 40 cm coral tail on Layer A for sewing.
Sage Leaves (make 5 per medallion: 715 for a queen, 315 for a throw)
- With sage green and the 3.5 mm hook, ch 8.
- Sc in 2nd ch from hook, hdc in next ch, dc in next 2 ch, hdc in next ch, sc in next ch, 3 sc in last ch. (9 sts)
- Working along the other side of the chain: sc in next ch, hdc in next ch, dc in next 2 ch, hdc in next ch, sc in next ch, sl st in first sc. Fasten off with a 15 cm tail. (15 sts)
- The leaf is about 3.5 cm long with a pointed tip.
Sewing the Peony to the Medallion
- Lay the medallion RS up. Set 5 leaves on Rnds 3 and 4, evenly spaced, with the tips pointing out toward the scallops. Sew each leaf down by its base only.
- Set the peony in the center so it covers Rnds 1 to 3 and the leaf bases. The leaf tips must peek out between the outer petals and the lace.
- With the coral tail, sew the peony on from the WS: first a small circle around Rnd 1 of the peony, then a circle along the base of Layer A (Rnd 6 of the peony). Sew through the base only, never through the petals, so they stay loose and 3D.
- Attach the peony before you join the medallion to the blanket. It is much easier to sew on a single motif than on a heavy bedspread.
Joining the Medallions
- Layout: 11 x 13 = 143 medallions for a queen (about 187 x 221 cm before the border), or 7 x 9 = 63 for a throw (about 119 x 153 cm). For a smaller flat lay like the one in the photos, 5 x 7 = 35 medallions make about 85 x 119 cm.
- A and B medallions: place them like a checkerboard, starting with a B medallion (with the coral ring) in each corner. A queen has 72 B and 71 A medallions; a throw has 32 B and 31 A.
- Join as you go on Rnd 7: work the new medallion as normal, but at each joining picot that touches a finished medallion, work a joining picot into its matching joining picot (1, 5, 9 or 13) instead of a plain picot.
- Each medallion joins to its neighbors only at those 4 points. There are always 3 picots between two joins. Never join the filler picots (3, 7, 11, 15) to another medallion.
- Work the first row from left to right, then start each new row at the same end. A medallion in the middle of the blanket joins to the one before it in the row and to the one above it.
- The medallions should touch only at the joins and leave a round gap between every 4 of them. The fillers close these gaps.
Lace Fillers
- Full filler (make 120 for a queen, 48 for a throw, one in each gap between 4 medallions): with cream and the 4 mm hook, MR, ch 1, 8 sc in ring, join. (8 sc)
- Rnd 2: ch 3, dc in same st, 2 dc in each sc around, join. (16 dc)
- Rnd 3: ch 1, sc in first dc, ch 5, sk next dc, *sc in next dc, ch 5, sk next dc; rep from * 6 more times, join to first sc. (8 ch-5 loops)
- Rnd 4 (joining): sl st in first loop, *(3 sc, ch 3, 3 sc) in next loop, then in the following loop work (3 sc, joining picot, 3 sc), joining to the filler picot of one of the 4 medallions; rep from * 3 more times, join. Fasten off. (8 loops, 48 sc; 4 picots joined, 4 free) Each filler joins to picot 3, 7, 11 or 15 of the medallion beside it.
- Half filler (make 44 for a queen, 28 for a throw, one in each gap along the outer edges): Row 1: MR, ch 3, 7 dc in ring. Pull tight. (8 sts)
- Row 2: ch 3 (counts as dc), turn, dc in first st, 2 dc in each st across. (16 dc)
- Row 3: ch 1, turn, sc in first dc, *ch 5, sk 2 dc, sc in next dc; rep from * 4 more times. (5 ch-5 loops)
- Row 4 (joining): ch 1, turn, (3 sc, ch 3, 3 sc) in loop 1, (3 sc, joining picot, 3 sc) in loop 2, (3 sc, ch 3, 3 sc) in loop 3, (3 sc, joining picot, 3 sc) in loop 4, (3 sc, ch 3, 3 sc) in loop 5. Fasten off. (30 sc) Set the flat edge on the outer line of the blanket and join loops 2 and 4 to the filler picots of the 2 edge medallions.
- Quarter filler (make 4, one in each corner): Row 1: MR, ch 3, 3 dc in ring. Pull tight. (4 sts)
- Row 2: ch 3 (counts as dc), turn, dc in first st, 2 dc in each of next 2 dc, dc in top of ch 3. (7 dc)
- Row 3: ch 1, turn, sc in first dc, *ch 5, sk next dc, sc in next dc; rep from * 2 more times. (3 ch-5 loops)
- Row 4 (joining): ch 1, turn, (3 sc, ch 3, 3 sc) in loop 1, (3 sc, joining picot, 3 sc) in loop 2, (3 sc, ch 3, 3 sc) in loop 3. Fasten off. (18 sc) Put the ring in the corner point of the blanket and join loop 2 to the outer filler picot of the corner medallion.
Mesh and Coral Scallop Border
- In the counts below, a “side” with M medallions has M = 11 or 13 for the queen and M = 7 or 9 for the throw. Each edge medallion has 3 free picots facing out: one in the middle that points straight out, and one each side of it.
- Rnd 1 (straight edge): with cream and the 4 mm hook, join in the ring of a quarter filler. Work along each side like this: (sc, ch 3, sc) in the quarter filler ring, ch 5, hdc in the ch-3 sp of the next quarter filler loop, ch 3; on each medallion: hdc in first outer picot, ch 5, sc in middle picot, ch 5, hdc in last outer picot, ch 3; on each half filler: hdc in ch-3 sp of loop 1, ch 5, sc in the ring, ch 5, hdc in ch-3 sp of loop 5, ch 3; at the end of the side: hdc in the ch-3 sp of the quarter filler loop, ch 5, then work the next corner. Join. (6M + 1 sts and 26M ch per side, counting the corner sc at each end: 353 for 11 medallions, 417 for 13, 225 for 7, 289 for 9)
- Rnd 2: sl st in corner ch-3 sp, ch 3, (dc, ch 3, 2 dc) in same sp, *dc in each st and in each ch along the side, (2 dc, ch 3, 2 dc) in corner sp; rep from * around, ending with dc in each st and ch of the last side, join. (32M + 5 dc per side: 357, 421, 229 or 293)
- Rnd 3 (mesh): sl st in next dc and in corner sp, ch 4 (counts as dc and ch 1), ch 2, dc in same sp, ch 1, *dc in first dc of the side, (ch 1, sk next dc, dc in next dc) to the end of the side, ch 1, (dc, ch 3, dc) in corner sp, ch 1; rep from * around, ending with the last side, ch 1, join to 3rd ch of beginning ch 4. (16M + 4 ch-1 sps per side: 180, 212, 116 or 148)
- Rnd 4 (mesh): sl st in corner sp, ch 4, ch 2, dc in same sp, ch 1, *dc in each dc along the side with ch 1 over each ch-1 sp, ch 1, (dc, ch 3, dc) in corner sp, ch 1; rep from * around, join. Fasten off cream. (16M + 6 ch-1 sps per side: 182, 214, 118 or 150)
- Rnd 5 (coral line): join coral in the first dc after any corner. Ch 1, *sc in each dc and in each ch-1 sp along the side, ending with sc in the last dc before the corner, ch 3, sk corner sp; rep from * around, join. (32M + 13 sc per side: 365, 429, 237 or 301)
- Rnd 6 (coral scallops): ch 1, *sc in first sc of the side, (sk next sc, 5 dc in next sc, sk next sc, sc in next sc) to the end of the side, 7 dc in corner ch-3 sp; rep from * around, join. Fasten off coral. (8M + 3 scallops per side: 91, 107, 59 or 75)
- Rnd 7 (cream picot edge): join cream in the center dc of any corner. *In each side scallop: sc in next 2 dc, (sc, picot) in center dc, sc in next 2 dc, sl st in the sc between scallops; in each corner scallop: sc in next 3 dc, (sc, picot) in center dc, sc in next 3 dc; rep from * around, join. Fasten off. (1 picot on every scallop)
Finishing
Weave in all lace tails on the WS under the solid dc of Rnds 1 and 2, never across the open loops. Weave the coral and sage tails into the back of the peony base, where they cannot show through the lace.
Lay the bedspread RS up on towels or blocking mats. Mist it with water and pin each medallion round, then pin out the border scallops and picots in a straight line. Do not press the peonies. Shape the petals with your fingers so the inner layers stand up and the outer layers open wide, then let it dry completely.
Tips for Success
- Make the pieces in batches: all medallions to Rnd 6, then all peony bases, then all petal layers, then all leaves. Batches go much faster than one motif at a time.
- Use stitch markers on Rnd 6 of the peony base. The petal layers only work out if each base round has the right count.
- Put a marker on picot 1 of every medallion as you make it, so you can find the joining picots quickly.
- Work the peony layers from the outside in. The outer petals are easier to reach before the inner layers are in the way.
- Block one finished medallion with its peony and keep it next to you as your size guide for the whole project.
Common Mistakes to Avoid
- Working the peony base in both loops. Rnds 2 to 6 must go in the back loops only, or there are no front loops left for the petal layers.
- Joining the wrong picot. Always leave 3 picots between two medallion joins; one picot off and the whole row turns crooked.
- Peonies that flop. Sew around the base of Layer A as well as the center, or the heavy outer petals tip over when the bedspread hangs.
- A wavy edge. Rnd 1 of the border must use ch 5 and ch 3 exactly as written; shorter chains pull the edge in between the medallions.
- Scallops that do not fit. Count Rnd 5 before you start Rnd 6. Each side needs 32M + 13 sc, or the last scallop will not sit right at the corner.
Ways to Customize This Pattern
- Use two or three shades for the peonies, such as coral, salmon and dusty pink, and mix them across the bedspread like the one on the bed in the photos.
- Put the coral ring on every medallion, or only on the center column, for a different rhythm.
- Make matching cushions: join 4 medallions with 1 full filler, add Rnds 1 to 4 of the border, and sew the panel onto a coral cushion cover.
- Make a table runner of 3 x 7 medallions with the full border. It shows off the peonies without the time of a full bedspread.
- Leave Layer E out and add more yellow French knots for a more open, summer peony look.
Frequently asked questions
A queen of 11 x 13 needs 143 medallions, 143 peonies, 715 leaves, 120 full fillers, 44 half fillers and 4 quarter fillers. A throw of 7 x 9 needs 63 medallions and peonies, 315 leaves, 48 full fillers, 28 half fillers and 4 quarter fillers.
You can, but cotton holds the cupped petals and the lace much better. Acrylic petals tend to go limp and the medallions stretch out of shape. A cotton blend is a good middle way if you want a softer bedspread.
It is heavier than a plain lace bedspread, but the open lace keeps it lighter than a solid blanket. The peonies sit only in the middle of each medallion, so the weight is spread evenly.
Yes. Make all medallions with plain picots, then sew the matching joining picots together with a few stitches. Join as you go is faster and gives neater joins, so it is worth learning for a project this size.
Wash it on a gentle cold cycle in a large laundry bag and dry it flat. Shape the peonies with your fingers while they are damp. Test a scrap of coral with cream first so the color does not bleed.