Lilac 3D Hydrangea Crochet Bedspread
Advanced
For experienced crocheters who enjoy complex shaping, fine detail, and ambitious construction
Single-Day Project
A satisfying project you can complete in a single afternoon or evening.
Handmade Gift
A beautiful keepsake — free forever. Read online or print at home.
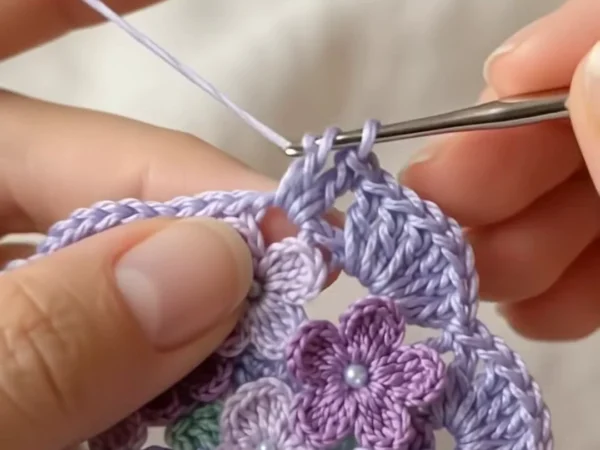 Magic ring & first rounds
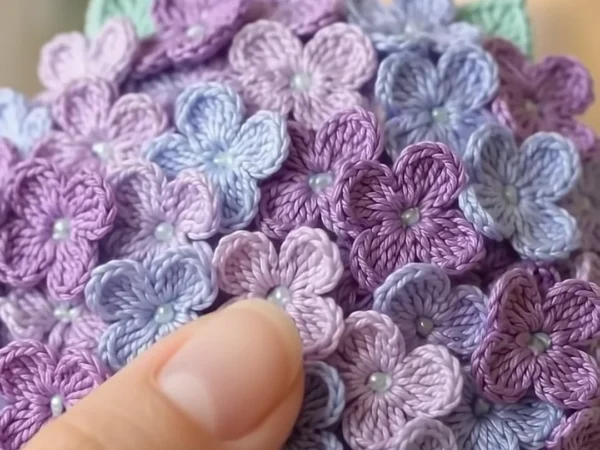 Building the shape
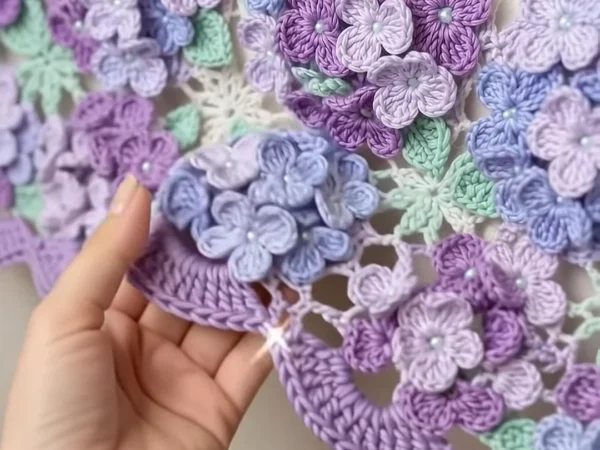
 Assembly in progress
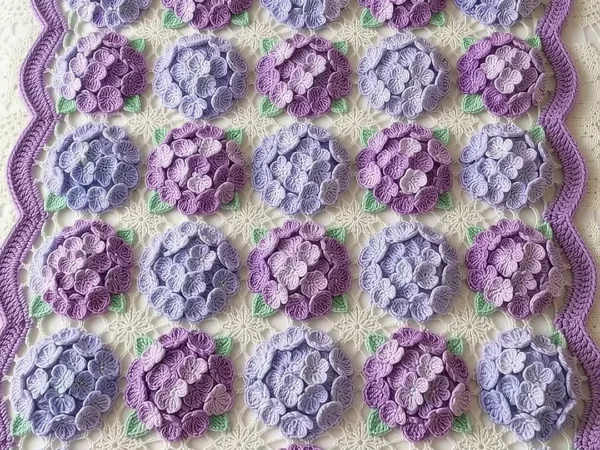
 Finished & ready!
About This Lilac 3D Hydrangea Crochet Bedspread
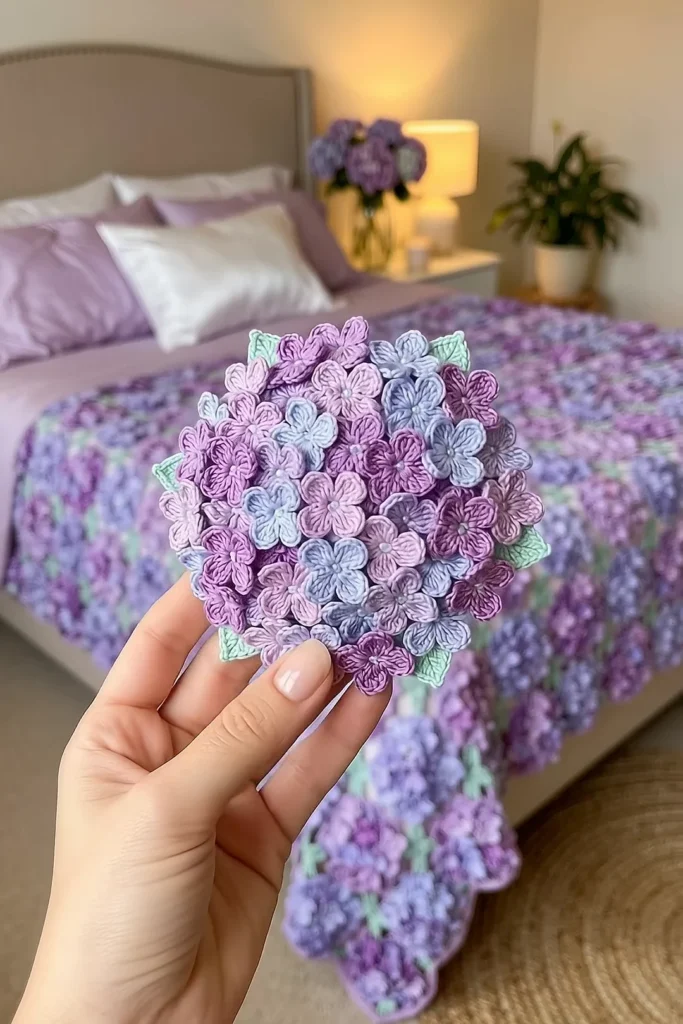
This hydrangea crochet blanket pattern turns every square into a full, round hydrangea head: about 30 tiny five-petal flowers in lilac, lavender, periwinkle blue and soft purple, packed tightly over a small padded dome. Each little flower has a pearl bead in the middle, and a few mint green leaves peek out at the edge. Some clusters lean blue and some lean purple, and they sit in a checkerboard so the whole bed looks like a garden bed in full bloom.
Each motif starts as a flat lilac circle with a shell edge. A cream lace frame turns the circle into a square, so the hydrangeas float on an open cream background when the motifs are joined. A lightly stuffed dome under the center gives each cluster its rounded shape. Small mint and cream lace stars fill the gaps where four squares meet, and a wavy lilac scalloped border finishes the edge.
A queen bedspread takes about 290 to 320 hours and a throw about 130 to 145 hours. One complete motif with all its flowers takes about 150 minutes. This is an advanced project for a patient crocheter who likes small repeat pieces, color planning and a lot of careful sewing.
Materials
- DK weight cotton yarn, lilac about 5,900 m for a queen (30 balls of 100 g / 200 m), or 2,650 m for a throw (14 balls); for bases, domes, flowers and border
- DK weight cotton yarn, cream about 3,200 m for a queen (16 balls), or 1,400 m for a throw (7 balls)
- DK weight cotton yarn, periwinkle blue about 1,700 m for a queen (9 balls), or 730 m for a throw (4 balls)
- DK weight cotton yarn, soft purple about 1,700 m for a queen (9 balls), or 730 m for a throw (4 balls)
- DK weight cotton yarn, lavender about 1,500 m for a queen (8 balls), or 640 m for a throw (4 balls)
- DK weight cotton yarn, mint green about 450 m for a queen (3 balls), or 190 m for a throw (1 ball)
- 4 mm white pearl beads with a hole 3,300 for a queen, 1,440 for a throw (30 per motif)
- Lilac sewing thread and a beading needle for the pearl centers
- Polyester fiberfill a small handful for every 10 domes
- 4 mm (G-6) crochet hook for the bases, cream frames, joining and border
- 3.5 mm (E-4) crochet hook for the domes, leaves and stars
- 3 mm crochet hook for the tiny flowers
- Stitch markers, sewing pins, tapestry needle and scissors
Abbreviations
MRmagic ringchchainsl stslip stitchscsingle crochethdchalf double crochetdcdouble crochettrtrtriple treble: yarn over 4 times, insert hook, pull up a loop, (yarn over, pull through 2 loops) 5 timesspspaceskskipst(s)stitch(es); in the mesh rnd each ch-1 sp counts as 1 strndroundreprepeatRS / WSright side / wrong sideHydrangea Base (lilac, make 110 for a queen, 48 for a throw)
- Rnd 1: with lilac and the 4 mm hook, MR, ch 3 (counts as dc here and throughout), 11 dc in ring, join with sl st to top of ch 3. Pull the ring tight. (12 dc)
- Rnd 2: ch 3, dc in same st, 2 dc in each remaining st, join. (24 dc)
- Rnd 3: ch 3, 2 dc in next st, *dc in next st, 2 dc in next st; rep from * 10 more times, join. (36 dc)
- Rnd 4: ch 3, dc in next st, 2 dc in next st, *dc in next 2 sts, 2 dc in next st; rep from * 10 more times, join. (48 dc)
- Rnd 5: ch 3, dc in next 2 sts, 2 dc in next st, *dc in next 3 sts, 2 dc in next st; rep from * 10 more times, join. (60 dc)
- Rnd 6 (shell edge): ch 1, *sc in next 2 sts, sk 1 st, 5 dc in next st, sk 1 st; rep from * 11 more times, join with sl st to first sc. Fasten off. (12 shells and 24 sc; each rep uses 5 sts, 12 x 5 = 60) The circle is about 13 cm across.
Cream Lace Frame
- Rnd 7: with cream and the 4 mm hook, join with sl st in the center (3rd) dc of any shell. Ch 6 (counts as trtr), (trtr, ch 3, 2 trtr) in same st for the first corner, *ch 7, sc in center dc of next shell, ch 7, sc in center dc of next shell, ch 7**, (2 trtr, ch 3, 2 trtr) in center dc of next shell; rep from * 2 more times, then from * to ** once, join to top of ch 6. (4 corners of 4 trtr each, 8 sc, 12 ch-7 sps)
- Rnd 8: sl st in next trtr and in corner ch-3 sp, ch 3, (2 dc, ch 3, 3 dc) in same sp, *7 dc in each of next 3 ch-7 sps, (3 dc, ch 3, 3 dc) in next corner sp; rep from * 2 more times, 7 dc in each of last 3 ch-7 sps, join. Skip all trtr and sc of Rnd 7. (27 dc per side: 3 + 21 + 3; 108 dc)
- Rnd 9 (mesh): sl st in next 2 dc and in corner sp, ch 6 (counts as dc and ch 3), dc in same sp, *ch 1, sk next dc, (dc in next dc, ch 1, sk next dc) 13 times, (dc, ch 3, dc) in corner sp; rep from * 2 more times, ch 1, sk next dc, (dc in next dc, ch 1, sk next dc) 13 times, join to 3rd ch of ch 6. (per side: 2 corner dc, 13 dc and 14 ch-1 sps)
- Rnd 10: sl st in corner sp, ch 1, 3 sc in same sp, *sc in each dc and each ch-1 sp across to next corner, 3 sc in corner sp; rep from * 2 more times, sc in each st and sp across, join. Fasten off. (29 sc per side between corner groups; 4 x 29 + 4 x 3 = 128 sc)
- Block the square to 19 x 19 cm. There are 31 sc on each side between the middle sc of two corners.
Dome Cushion (lilac, 1 per motif)
- Work in a continuous spiral with the 3.5 mm hook. Mark the first st of each rnd.
- Rnd 1: with lilac, MR, ch 1, 6 sc in ring. (6 sc)
- Rnd 2: 2 sc in each st around. (12 sc)
- Rnd 3: *sc in next st, 2 sc in next st; rep from * 5 more times. (18 sc)
- Rnd 4: *sc in next 2 sts, 2 sc in next st; rep from * 5 more times. (24 sc)
- Rnd 5: *sc in next 3 sts, 2 sc in next st; rep from * 5 more times. (30 sc)
- Rnd 6: *sc in next 4 sts, 2 sc in next st; rep from * 5 more times. (36 sc)
- Rnds 7-8: sc in each st around. (36 sc) Sl st in next st and fasten off with a 40 cm tail.
- Place the dome on the RS of the base, centered over Rnds 1-3. Sew the last rnd of the dome to the top of Rnd 3 of the base with the tail. Before you close the last 5 cm, stuff the dome lightly with fiberfill so it is rounded but still soft. The dome is about 7 cm across and 2 cm high.
Tiny Hydrangea Flowers (30 per motif)
- Rnd 1: with the 3 mm hook, MR, ch 1, 5 sc in ring, join with sl st to first sc. Pull the ring tight. (5 sc)
- Rnd 2 (petals): *(ch 2, dc, ch 1, dc, ch 2, sl st) all in next sc; rep from * 4 more times, working the last petal in the joining st. Fasten off with a 20 cm tail. (5 petals, each with a small notch at the tip)
- Center: with lilac sewing thread and the beading needle, sew one pearl bead into the middle of the ring. Bring the thread through the bead twice so it sits flat and firm.
- The flower is about 2.5 cm across. Make them in all four shades: periwinkle blue, lavender, lilac and soft purple.
- Cluster A (blue): 12 periwinkle, 8 lavender, 6 lilac, 4 soft purple. (30 flowers)
- Cluster B (purple): 12 soft purple, 8 lilac, 6 lavender, 4 periwinkle. (30 flowers)
Mint Leaves (4 per motif)
- With mint and the 3.5 mm hook, ch 7.
- Sl st in 2nd ch from hook, sc in next ch, hdc in next ch, dc in next ch, hdc in next ch, sc in last ch. (6 sts)
- Ch 1, turn the work and work along the other side of the chain: sc in first ch, hdc in next ch, dc in next ch, hdc in next ch, sc in next ch, sl st in last ch. (6 sts) Fasten off with a 20 cm tail. (12 sts in total)
- The leaf is about 3 cm long, with a point at the tip.
Building the Hydrangea Cluster
- Leaves first: pin the 4 leaves on Rnds 5-6 of the base, with their tips pointing to the 4 corners of the cream square. Sew them by the base end only, so the tips stay free.
- Outer ring: sew 12 flowers on Rnd 6, one over each shell, so the petals just cover the shell edge and partly cover the leaf bases.
- Middle ring: sew 10 flowers on Rnds 4-5, each one sitting in a gap between two flowers of the outer ring and overlapping them a little.
- Dome: sew 7 flowers around the side of the dome and 1 flower on the very top. (12 + 10 + 8 = 30 flowers)
- Sew each flower with its own tail, through the center ring only, in 3 or 4 small stitches into the base or dome. The petals stay free, so the cluster looks full and soft.
- Spread the shades evenly. Try not to let two flowers of the same shade touch. Put a few of the darkest flowers on the outer ring so the cluster has a clear round outline.
- Make half of the motifs as Cluster A (blue) and half as Cluster B (purple): 55 of each for a queen, 24 of each for a throw.
Joining the Motifs
- Layout: 10 x 11 = 110 motifs for a queen (about 200 x 219 cm with the border), 6 x 8 = 48 for a throw (about 124 x 162 cm), or 5 x 8 = 40 for a single bed as in the photo (about 105 x 162 cm).
- Lay the motifs out in a checkerboard: A, B, A, B across the first row, then B, A, B, A across the next row. No two clusters of the same color group touch along a side.
- With cream and the 4 mm hook, hold two motifs RS together and sl st through the back loops of each pair of sc, from middle corner sc to middle corner sc. (33 sl st per side) Push the flowers away from the edge as you work.
- Join all the horizontal seams first, then the vertical ones. At each crossing, work through all four middle corner sc so the corners meet in one point.
- The seam lies flat on the RS and almost disappears into the cream lace.
Lace Stars (mint and cream)
- Rnd 1: with the 3.5 mm hook, MR, ch 1, 5 sc in ring, join with sl st to first sc. Pull tight. (5 sc)
- Rnd 2: *ch 5, sl st in 2nd ch from hook, sc in next ch, hdc in next ch, dc in last ch, sl st in next sc of Rnd 1; rep from * 4 more times, working the last sl st in the first sc. Fasten off with a 25 cm tail. (5 points)
- The star is about 4 cm across. You need one star for each point where four motifs meet: 9 x 10 = 90 for a queen, 5 x 7 = 35 for a throw, 4 x 7 = 28 for the single bed.
- Make half in mint and half in cream (45 of each for a queen; 18 mint and 17 cream for a throw), and place them so the colors alternate.
- Sew each star over a 4-corner crossing, through the center ring and the tip of each point, so it lies flat on the cream mesh.
Wavy Lilac Border
- Rnd 1: with lilac and the 4 mm hook, join with sl st in the middle sc of any blanket corner. Ch 3, 4 dc in same st, *dc in each sc across, working 1 dc in each seam (the two joined corner sc count as 1 st), 5 dc in the middle sc of next blanket corner; rep from * 2 more times, dc in each st across, join. (32 dc per motif minus 1 on each side: 6 motifs = 191 dc, 8 motifs = 255 dc, 10 motifs = 319 dc, 11 motifs = 351 dc, plus 5 dc at each corner)
- Rnd 2: sl st in next 2 dc, ch 3, 4 dc in same st, *dc in each dc to center dc of next corner, 5 dc in center dc; rep from * 2 more times, dc in each remaining dc, join. (each side now has 32 dc per motif plus 3 between the corner center sts)
- Rnd 3 (scallops): sl st in next 2 dc, ch 3, 8 dc in same st for the corner scallop, *sk 3 dc, sc in next dc, (sk 3 dc, 7 dc in next dc, sk 3 dc, sc in next dc) 4 times for each motif on that side, sk 3 dc, 9 dc in center dc of next corner; rep from * 2 more times, then work the last side the same way and join. (4 scallops per motif: 24 and 32 on a throw, 40 and 44 on a queen; each side uses 3 + 1 + 32 per motif + 3 sts, which matches Rnd 2 exactly)
- Rnd 4: ch 1, sc in each st around, working 3 sc in the center dc of each scallop (the 4th dc of a side scallop, the 5th dc of a corner scallop). Join and fasten off.
Finishing
Weave in every flower and leaf tail on the WS, under the solid lilac dc of its own base, not across the cream mesh. Tails woven through the mesh show on the RS. Hide star tails under the sl st seams.
Lay the bedspread flat RS up and mist only the cream frames and the border. Pin each scallop into a round wave and pin the mesh squares straight. Do not press the clusters. When everything is dry, fluff each hydrangea with your fingers and lift any petals that got flattened.
Tips for Success
- Make the tiny flowers in big batches by shade and keep each shade in its own bag. Sew the pearls on at the end of each batch, not one by one.
- Build one Cluster A and one Cluster B first, take a photo of each, and use the photos as your guide for the rest.
- Stuff the domes the same way every time. Weigh the fiberfill for your first dome and use the same amount for all of them.
- Leave the long tail on every flower; it is your sewing thread, so you will have far fewer ends to weave in.
- Join the motifs on a big table or the bed itself, so the weight of the clusters does not pull the seams while you work.
Common Mistakes to Avoid
- A frame that does not lie flat. The corner shells must get trtr and the side shells only sc. Count 3 ch-7 sps on every side of Rnd 7 before you go on.
- The wrong mesh count. Rnd 8 needs exactly 27 dc per side for 13 dc and 14 ch-1 sps in Rnd 9. If you have 26 or 28, the mesh will not end in a ch-1 sp at the corner.
- Flat clusters. A dome with too little stuffing, or flowers sewn by their petals, makes a flat patch instead of a round hydrangea.
- Loose pearls. Sew each pearl through twice and knot on the WS of the flower; a single pass will work loose in the wash.
- A wavy border that cups or ruffles. Check that each side of Rnd 2 has 32 dc per motif plus 3. The scallops only fit when this count is right.
Ways to Customize This Pattern
- Make pink and white hydrangeas with a sage frame and a dusty rose border for a soft cottage look.
- Use only blue shades, from pale sky to deep periwinkle, for a cool summer bedspread.
- Replace the pearls with French knots in white floss for a baby blanket, so nothing can be pulled off.
- Make a single motif with a larger cluster of 40 flowers and add a back panel to turn it into a cushion.
- Alternate hydrangea motifs with plain cream lace squares for a lighter, quicker bedspread.
Frequently asked questions
A queen of 110 motifs needs 3,300 flowers: 880 periwinkle, 880 soft purple, 770 lavender and 770 lilac, plus 440 leaves and 90 stars. A throw of 48 motifs needs 1,440 flowers, 192 leaves and 35 stars.
Yes, but the cluster will be flatter. You can stack two or three extra flowers in the center instead of the dome. The dome gives the round hydrangea shape with fewer flowers.
Cotton keeps the small petals crisp and the lace frame open. Acrylic makes softer, fuzzier petals that lose their shape in such a small size.
You can join Rnd 10 of each frame to its neighbors as you go, but build the full cluster first. It is very hard to sew 30 flowers onto a motif that is already part of a big, heavy blanket.
Hand wash in cool water or use a gentle cold cycle inside a large laundry bag, then dry flat. Press water out with a towel; never wring the clusters. Test each purple and blue shade with cream first for color bleeding.