Midnight Gold Star Crochet Blanket
Beginner Friendly
Perfect for those just starting their crochet journey, with clear instructions and simple techniques
Weekend Project
A satisfying weekend make — start Friday, finish Sunday, enjoy forever.
Handmade Gift
A beautiful keepsake — free forever. Read online or print at home.
 Magic ring & first rounds
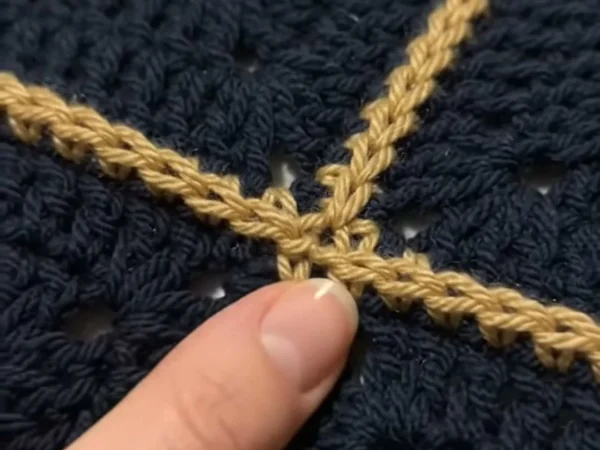 Building the shape
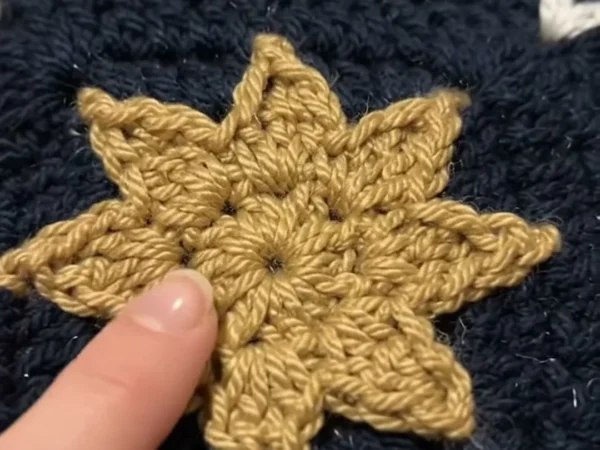 Assembly in progress
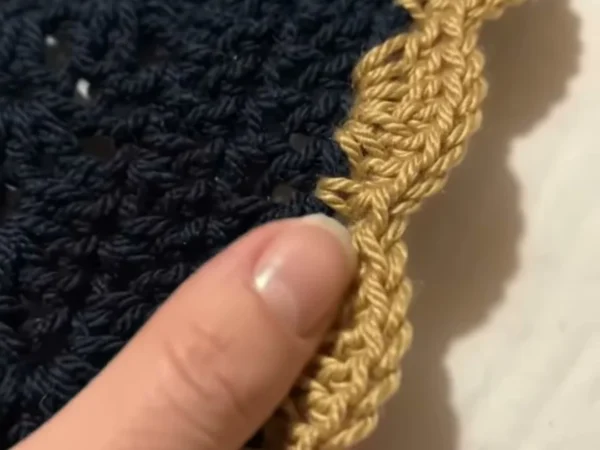 Finished & ready!
About This Midnight Gold Star Crochet Blanket
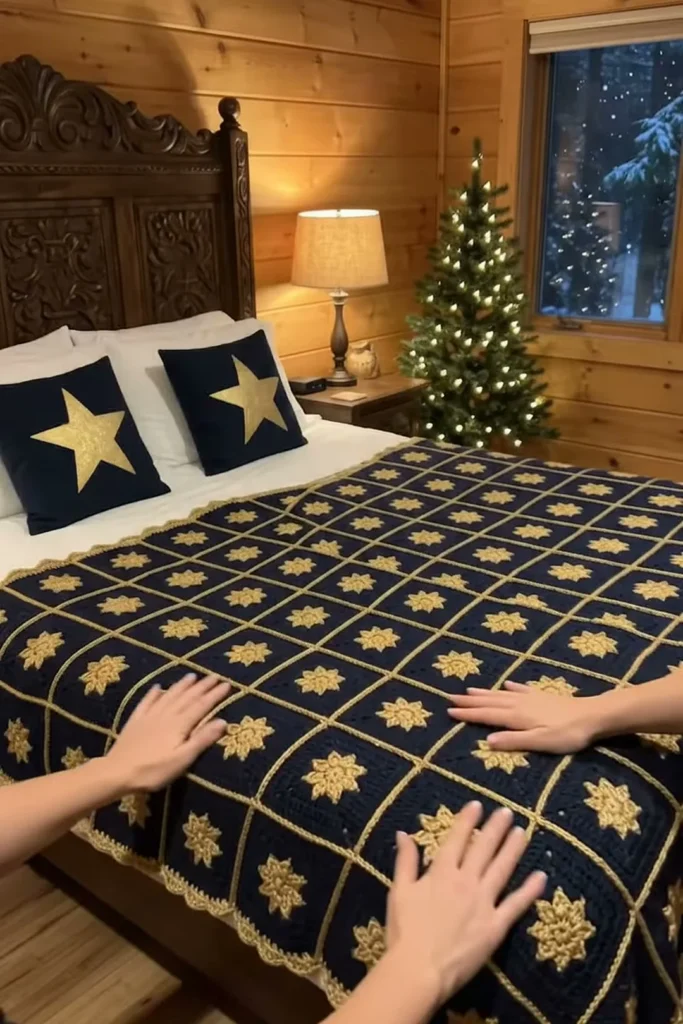
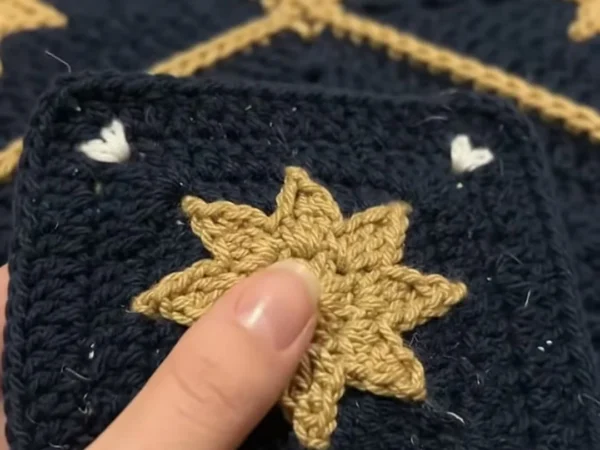
This gold star crochet blanket pattern makes a winter bedspread that looks like a night sky: solid midnight navy squares, each with a raised 8-point gold star in the center and four tiny white snowflakes in the corners. Raised gold seams frame every square in a neat grid, and a wavy gold scalloped edge runs all the way around.
Each square and each star is made separately. The square is a solid granny worked in double crochet, and the star is a small circle with eight points chained out and worked back down, so each point is narrow at the tip and wide at the base. You sew the star on, stitch the snowflakes, then join the squares with gold single crochet held on the right side, which makes the raised gold lines.
A queen bedspread takes about 110 to 130 hours, and a sofa throw about 50 to 60. One square takes about 40 minutes and one star about 15. Only beginner stitches are used, so it suits anyone who can work a granny square and keep their tension even.
Materials
- Worsted weight yarn, midnight navy about 10,000 m for a bedspread (50 skeins of 100 g / 200 m), or 4,300 m for a throw (22 skeins)
- Worsted weight yarn, gold or mustard about 2,200 m for a bedspread (11 skeins), or 960 m for a throw (5 skeins), for the stars, seams and border
- Worsted weight yarn, white about 60 m, for the snowflakes
- 5 mm (H-8) crochet hook for the squares, joining and border
- 4.5 mm (7) crochet hook for the stars, so they lie flat
- Stitch markers to mark the corners
- Blocking mats and rust-proof pins
- Tapestry needle and scissors
Abbreviations
MRmagic ringchchainsl stslip stitchscsingle crochethdchalf double crochetdcdouble crochetBLOback loop onlyspspaceskskipst(s)stitch(es)rndroundreprepeatRS / WSright side / wrong sideHow the Star Square Works
The navy square is a solid granny: a ring of 12 dc with 4 corners, then rounds of dc where each corner gets (2 dc, ch 2, 2 dc). Each side grows by 4 stitches every round, so the square stays flat and the corners stay sharp.
The star is made separately with a smaller hook. Two rounds of sc make a small, firm disc, and each of the 8 points is a ch 5 worked back down with taller and taller stitches: sl st, sc, hdc, dc. That gives a point that is narrow at the tip and wide at the base, the classic star shape.
Sewing the star on top, instead of crocheting it into the square, keeps the navy plain and smooth and makes the star stand out in 3D. The gold single crochet join, worked with the wrong sides together, adds a raised gold line around every square.
Sizes and How Many Squares
- Each blocked square measures 20 x 20 cm, and the gold join adds a few millimeters per seam.
- Cushion front: 4 squares, about 40 x 40 cm.
- Baby blanket: 4 x 5 = 20 squares, about 85 x 105 cm with border.
- Throw: 7 x 8 = 56 squares, about 145 x 165 cm with border.
- Queen bedspread: 11 x 12 = 132 squares, about 225 x 245 cm with border.
- Yarn per square, to plan any size: about 75 m navy and 8 m gold for the star. Joining and border use about 3 m of gold per square.
Navy Square (make 132 for a bedspread, 56 for a throw)
- Rnd 1: with navy and 5 mm hook, MR, ch 3 (counts as dc here and throughout), 2 dc in ring, ch 2, *3 dc in ring, ch 2; rep from * 2 more times, join with sl st to top of ch 3. Pull the ring tight. (12 dc, 4 corner ch-2 sps)
- Rnd 2: sl st in next 2 dc and in corner sp, ch 3, (dc, ch 2, 2 dc) in same sp, *dc in each dc to next corner, (2 dc, ch 2, 2 dc) in corner sp; rep from * 2 more times, dc in each remaining dc, join. (28 dc: 7 per side)
- Rnd 3: ch 3, dc in each dc around, working (2 dc, ch 2, 2 dc) in each corner sp, join. (44 dc: 11 per side)
- Rnds 4-7: rep Rnd 3, adding 4 dc per side each rnd. (Rnd 4: 60 dc, Rnd 5: 76, Rnd 6: 92, Rnd 7: 108 dc, 27 per side)
- Rnd 8: ch 1, sc in each dc around, working 3 sc in each corner sp, join. Fasten off. (120 sc: 27 per side plus 3 at each corner)
- Block the square to 20 x 20 cm.
Gold 8-Point Star (make 1 per square)
- Rnd 1: with gold and 4.5 mm hook, MR, ch 1, 8 sc in ring, join with sl st to first sc. Pull the ring tight. (8 sts)
- Rnd 2: ch 1, 2 sc in each st around, join. (16 sts)
- Rnd 3 (points): *ch 5, sl st in 2nd ch from hook, sc in next ch, hdc in next ch, dc in next ch, sk next st of Rnd 2, sl st in next st; rep from * 7 more times. (8 points)
- Fasten off leaving a 40 cm tail for sewing. Steam or wet-block the star flat with the points pinned out evenly. The star measures about 11 cm across.
Snowflakes and Star Assembly
- Thread white yarn on a tapestry needle. Each snowflake sits 2 rnds in from a corner of the square.
- Work 3 straight stitches about 1.5 cm long that cross in the middle, one vertical and two diagonal, like an asterisk. Knot the ends on the WS and weave them under the navy sts. (4 snowflakes per square)
- Pin the star to the center of the square with two points in line with the top edge.
- With the gold tail, sew around Rnd 2 of the star with small whip stitches through the square.
- Tack the tip of each point with 2 small stitches so the points stay flat. Knot on the WS and weave in the tail.
Joining the Squares
- Lay out the squares: 11 across and 12 long for a bedspread (about 220 x 240 cm), or 7 across and 8 long for a throw (about 140 x 160 cm).
- Join method: hold two squares WS together with the edges matched. With gold and 5 mm hook, sc through both loops of both squares in each matching st, starting and ending in the center sc of each corner. (31 sc per side, including both corners) This leaves a raised gold ridge on the RS.
- Join the squares into rows first, carrying on from square to square without fastening off, then join the rows along their long edges.
- Where four corners meet, work over the gold ridge that is already there so the lines cross in a neat cross.
Gold Scalloped Border
- Rnd 1: with gold and 5 mm hook, RS facing, join in any corner. Ch 1, sc in each st around, working 1 sc in each seam and 3 sc in each outer corner st. Join.
- Rnd 2: ch 2 (does not count as a st), hdc in each st around, working 3 hdc in each corner st. Join. Each side needs a multiple of 6 sts plus 1; skip or add a st near the corners to get there.
- Rnd 3: ch 1, sc in first st, *sk 2 sts, 7 dc in next st, sk 2 sts, sc in next st; rep from * around, working 7 dc in each corner st. Join. (1 scallop every 6 sts)
- Rnd 4: ch 1, sl st in the BLO of each st around. Join and fasten off.
- The border is about 5 cm wide.
Matching Star Cushions (make 2)
- Large navy square: work Rnds 1-7 of the Navy Square, then rep Rnd 3 nine more times. (Rnd 16: 252 dc, 63 per side) Work Rnd 8 as written to finish. The square measures about 40 cm.
- Large gold star: with gold and a 4.5 mm hook, MR, ch 1, 8 sc. Rnd 2: 2 sc in each st (16). Rnd 3: *sc in next st, 2 sc in next st* around (24). Rnd 4: *ch 9, sl st in 2nd ch from hook, sc in next 2 ch, hdc in next 2 ch, dc in next 3 ch, sk 2 sts of Rnd 3, sl st in next st* 8 times. (8 points, about 22 cm across)
- Sew the large star to the center of the large square as for the bedspread, tacking each point.
- Back: make a second large navy square, or use navy fabric 43 x 43 cm. Join the front and back with the gold sc join around 3 sides, insert a 40 cm cushion form and close the last side.
Finishing
Weave in all ends on the WS, running the gold tails under gold sts and the white tails under navy sts so nothing shows through on the front.
Lay the bedspread flat, mist the border and pat each scallop into shape. Let it dry flat. Navy yarn can leave a little fluff on the gold, so go over the finished blanket once with a lint roller.
Tips for Success
- Make the stars in batches while you watch TV. They take about 15 minutes each, and batching keeps the points the same length.
- Sew the stars and stitch the snowflakes before joining. It is much easier on a single square than on a heavy blanket.
- Leave a long tail on every star so you can sew it on without joining new yarn.
- Block every square to 20 x 20 cm before joining. Same-size squares give straight gold lines.
- Use a smooth, low-fuzz gold yarn for the seams and border, so navy fluff doesn’t stick to it.
- Pin out all 8 points of each star the same way when you block them; uneven points are the first thing people notice on the bed.
- Keep the navy squares in a covered box as you finish them; dark yarn shows dust and lint quickly.
Common Mistakes to Avoid
- Squares of different sizes. Count each side at the end of Rnd 7 (27 dc) and block every square to the same size before joining.
- A star that curls. The star is worked with a smaller hook to stay flat; if it still cups, work Rnd 2 more loosely and steam it flat before sewing.
- Floppy star points. Sew down the center first, then tack the tip of every point.
- The gold ridge on the back. Hold the squares WS together, so the RS faces out on both, before working the sc join.
- Uneven scallops. Count each side after Rnd 2 of the border; it must be a multiple of 6 plus 1 before you start the scallops.
- A star rotated at an angle. Line up 2 points with the top edge of every square before you sew, so all the stars point the same way.
- Snowflakes pulled too tight. Leave the straight stitches relaxed; tight stitches pucker the navy fabric around them.
Ways to Customize This Pattern
- Change the colors: cream stars on forest green for a classic cabin look, or silver stars on charcoal for a modern winter version.
- Change the size: 4 squares make a cushion front and 20 squares (4 x 5) make a baby blanket of about 85 x 105 cm.
- Make the star cushions: continue the square for 9 more rnds (about 40 cm), make a large star with 16 sc in Rnd 2 and longer points, and sew it to a fabric back.
- Use a metallic gold yarn for the stars only, for a little sparkle under the lights.
- Leave out the snowflakes for a simpler, all-year starry blanket.
- Make a winter sky blanket with silver stars on some squares and gold on others, placed at random.
Frequently asked questions
20 for a baby blanket, 56 for a throw of about 145 x 165 cm with the border, and 132 for a queen bedspread of about 225 x 245 cm. You need one star for each square.
Yes. It only uses ch, sl st, sc, hdc and dc. The hardest part is keeping all the squares the same size, and blocking fixes most of that.
You can, but it needs color changes and different stitch counts. Sewing on a separate star is easier and gives the raised 3D look in the photos.
Wash it on a gentle cold cycle inside a large laundry bag, or by hand, and dry it flat. Wash a scrap of navy and gold together first to make sure the navy doesn’t bleed.
About 40 minutes for the navy square, 15 for the star and 5 for the snowflakes and sewing. Joining adds a few minutes per square.
No, if you sew around the whole center and tack every point. Wash the blanket in a laundry bag so the points don’t catch.
Yes. The gold star is a great appliqué for hats, bags or gift tags, and a garland of stars makes a nice matching decoration.