Red Cardinal Crochet Blanket
Advanced
For experienced crocheters who enjoy complex shaping, fine detail, and ambitious construction
Single-Day Project
A satisfying project you can complete in a single afternoon or evening.
Handmade Gift
A beautiful keepsake — free forever. Read online or print at home.
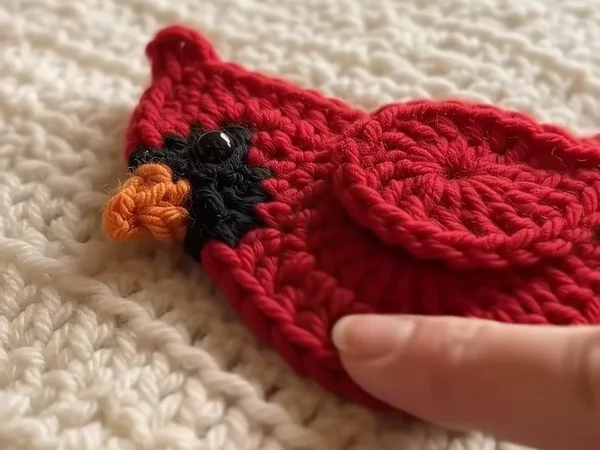
 Magic ring & first rounds
 Building the shape
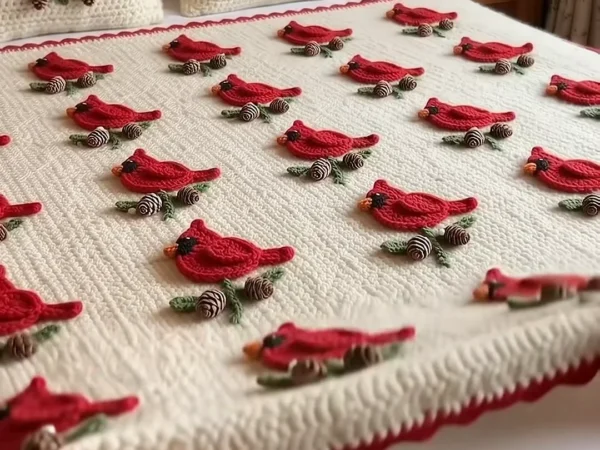 Assembly in progress
 Finished & ready!
About This Red Cardinal Crochet Blanket
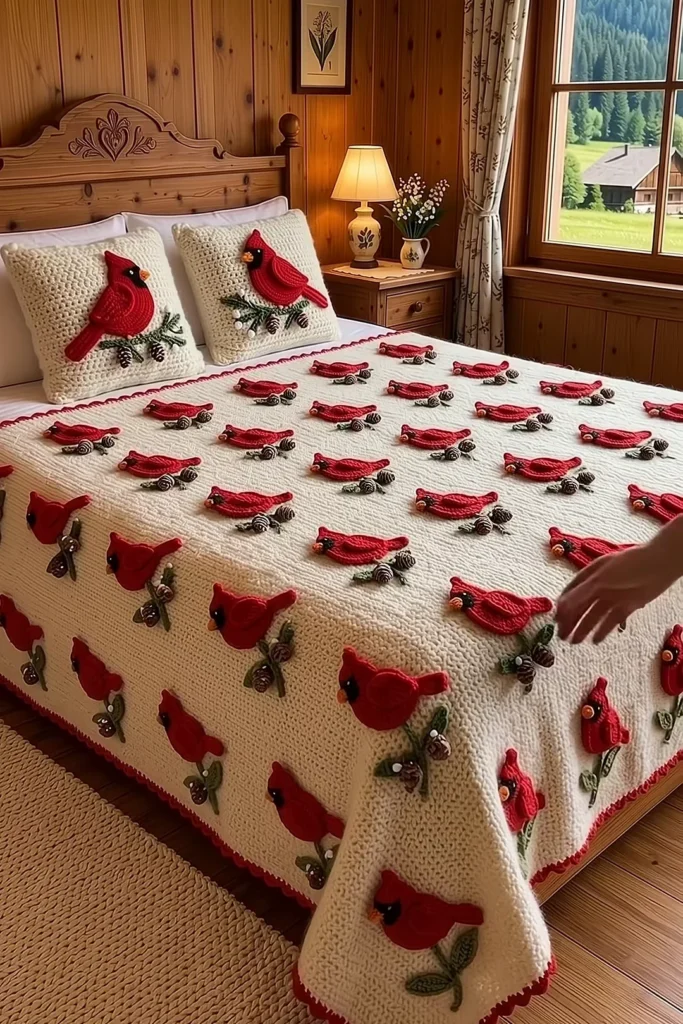
This red cardinal crochet blanket pattern turns a plain cream blanket into a winter forest: rows of bright red cardinals, each one perched on a green pine sprig with two little pinecones and a few white berries. The birds are not flat patches. Each cardinal has a lifted round wing, a pointed crest, a black mask, an orange beak and a long tail, so the whole blanket looks alive when you run your hand over it.
The blanket itself is worked in rows of griddle stitch, single crochet and double crochet side by side, with a raised ridge every eighth row. That gives the soft, bumpy cream texture you see in the photos and a firm surface for the appliques to sit on. The cardinals, sprigs, pinecones and berries are made separately and sewn on, and a red scalloped edge frames everything.
A queen size takes about 130 to 145 hours and a throw about 50 to 55. One complete cardinal set, with its branch, pinecones and berries, takes about an hour including sewing. This is an advanced project for a crocheter who is happy to work many small pieces and sew them neatly.
Materials
- Worsted weight yarn, cream about 5,600 m for a queen (28 skeins of 100 g / 200 m), or 2,200 m for a throw (11 skeins)
- Worsted weight yarn, cardinal red about 1,000 m for a queen (5 skeins), including the border, or 450 m for a throw (3 skeins)
- Worsted weight yarn, pine green about 260 m for a queen (2 skeins), or 100 m for a throw (1 skein)
- Worsted weight yarn, brown about 190 m for a queen (1 skein), or 75 m for a throw
- Worsted weight yarn, black, orange and white small amounts: about 35 m black, 20 m orange and 65 m white for a queen
- 5.5 mm (I-9) crochet hook for the blanket
- 4.5 mm (7) crochet hook for the appliques
- Black embroidery floss and a little white floss for the eyes
- Fiberfill a few small pinches for the pinecones
- Stitch markers, sewing pins and a tapestry needle
Abbreviations
MRmagic ringchchainsl stslip stitchscsingle crochethdchalf double crochetdcdouble crochettrtreble crochetsc2togsingle crochet 2 together (decrease)inc2 sc in the same stbobble3 dc in the same st, left open, then yarn over and pull through all 4 loopspcpopcorn: 5 dc in the same place, drop the loop, insert the hook in the first dc, pick up the loop and pull it throughFLOfront loop onlyskskipst(s)stitch(es)rndroundreprepeatRS / WSright side / wrong sideCream Griddle Blanket
- With cream and the 5.5 mm hook, ch 281 for a queen (ch 169 for a throw; for any size, an even number plus 1).
- Row 1 (RS): sc in 2nd ch from hook, dc in next ch, *sc in next ch, dc in next ch; rep from * across, turn. (280 sts)
- Row 2: ch 1, *sc in the dc, dc in the sc; rep from * across, turn. (280 sts)
- Rows 3-7: rep Row 2. Each row places a sc on top of a dc and a dc on top of a sc, which makes the bumpy griddle texture.
- Row 8 (ridge row, WS): ch 1, sc in FLO of each st across, turn. The free back loops make a raised line on the RS. (280 sts)
- Row 9: ch 1, *sc in next st, dc in next st; rep from * across, turn.
- Rep Rows 2-9 until the blanket measures about 225 cm for a queen (145 cm for a throw), ending with a Row 7. Fasten off. Leave the last 5 cm for the border.
Cardinal Body and Head (make 1 per cardinal)
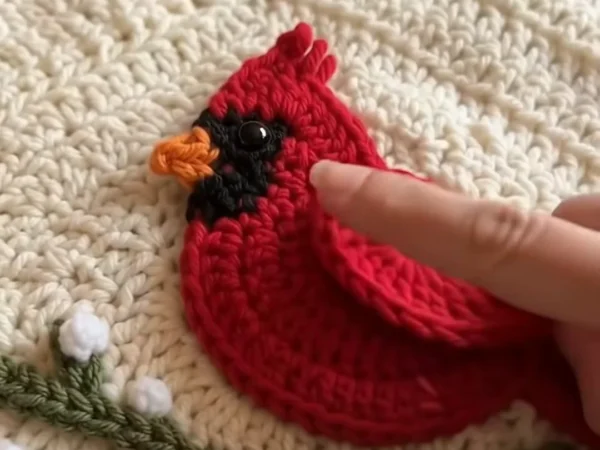
- Rnd 1: with red and the 4.5 mm hook, MR, ch 2 (does not count as a st), 10 hdc in ring, join with sl st to first hdc. Pull the ring tight. (10 sts)
- Rnd 2: ch 2, 2 hdc in each st around, join. (20 sts)
- Rnd 3: ch 2, *hdc in next st, 2 hdc in next st; rep from * 9 more times, join. (30 sts)
- Rnd 4: ch 2, *hdc in next 2 sts, 2 hdc in next st; rep from * 9 more times, join. Do not fasten off. (40 sts) The body circle is about 10 cm across.
- Head Row 1: ch 1, sc in next 8 sts, turn. (8 sts)
- Head Row 2: ch 1, sc2tog, sc in next 4 sts, sc2tog, turn. (6 sts)
- Head Row 3: ch 1, sc in each st across, turn. (6 sts)
- Head Row 4: ch 1, sc2tog, sc in next 2 sts, sc2tog, turn. (4 sts)
- Head Row 5: ch 1, sc2tog twice. Do not turn. (2 sts)
- Crest: ch 5, sl st in 2nd ch from hook, sc in next ch, hdc in next ch, dc in last ch, sl st in top of head. Ch 4, sl st in 2nd ch from hook, sc in next ch, hdc in last ch, sl st in same place. (2 crest points, the tall one at the back)
- Outline: ch 1, sc evenly down the side of the head and around the body to the other side of the head, working 2 sc at the base of each side of the neck. Join and fasten off with a 40 cm tail for sewing.
Tail and Wing
- Tail Row 1: with red, ch 13. Sc in 2nd ch from hook, sc in next ch, hdc in next 3 ch, dc in next 4 ch, tr in last 3 ch, turn. (12 sts)
- Tail Row 2: ch 3 (counts as tr), tr in next 2 sts, dc in next 4 sts, hdc in next 3 sts, sc in last 2 sts. Fasten off with a 25 cm tail. (12 sts) The tail is a wedge about 8 cm long; the narrow sc end tucks under the body.
- Wing Rnd 1: with red, MR, ch 2, 8 hdc in ring, join. Pull tight. (8 sts)
- Wing Rnd 2: ch 2, 2 hdc in each st around, join. (16 sts)
- Wing Rnd 3: ch 2, *hdc in next st, 2 hdc in next st; rep from * 7 more times, join. (24 sts)
- Wing Rnd 4 (tip): sl st in next 21 sts, hdc in next st, (dc, tr, ch 2, sl st in 2nd ch from hook, tr, dc) in next st, hdc in last st, join. Fasten off with a 30 cm tail. (24 sts and a pointed tip) The wing is about 7 cm across.
Mask, Beak and Eye
- Mask: with black, MR, ch 1, (sc, hdc, 3 dc, hdc, sc) in ring. Pull the ring tight so the stitches fan into a half circle. Fasten off with a 20 cm tail. (7 sts)
- Beak: with orange, MR, ch 1, (sc, hdc, ch 2, hdc, sc) in ring. Pull tight so it forms a small pointed triangle. Fasten off with a 15 cm tail.
- Eye: after the mask is sewn on, embroider the eye with black floss as a French knot wrapped 3 times, near the top edge of the mask. Add one tiny white straight stitch beside it as a highlight.
- Safety eyes are not used here: the back of a blanket must stay flat and smooth, and plastic backs can press through the fabric. If you make a cushion instead, a 9 mm safety eye works well and goes in before you sew the cardinal down.
Pine Sprig, Pinecones and Berries
- Pine sprig: with green, ch 16. Sl st in 2nd ch from hook, *ch 6, sl st in 2nd ch from hook and next 4 ch (1 needle), sl st in next 2 ch of the stem; rep from * 6 more times. (7 needles on one side)
- Turn the sprig and work along the free loops of the stem: *ch 6, sl st in 2nd ch from hook and next 4 ch, sl st in next 2 stem loops; rep from * 6 more times, sl st in last loop. Fasten off with a 30 cm tail. (14 needles, sprig about 10 cm)
- Pinecone Rnd 1: with brown, MR, 6 sc in ring. Pull tight. Work in a spiral, without joining. (6 sts)
- Pinecone Rnd 2: inc in each st around. (12 sts)
- Pinecone Rnd 3: *sc in next st, bobble in next st; rep from * 5 more times. (12 sts, 6 bobbles)
- Pinecone Rnd 4: *bobble in next st, sc in next st; rep from * 5 more times. (12 sts) The bobbles sit between those of Rnd 3, like scales.
- Pinecone Rnd 5: rep Rnd 3. Stuff lightly with a pinch of fiberfill. (12 sts)
- Pinecone Rnd 6: sc2tog 6 times. (6 sts)
- Pinecone Rnd 7: sc2tog 3 times. Fasten off, close the top and leave a 20 cm tail. (3 sts) Make 2 pinecones per cardinal.
- Berries: with white, MR, ch 2, 5 dc in ring, pull the ring tight, then close as a pc. Fasten off with a 15 cm tail. Make 3 per cardinal.
Assembling and Placing the Cardinals
- Sew the beak to the front edge of the head, then sew the mask over the face so its straight edge covers the base of the beak.
- Tuck the narrow end of the tail 2 cm under the back of the body so the tail points down and away from the head. Sew it from the WS of the body.
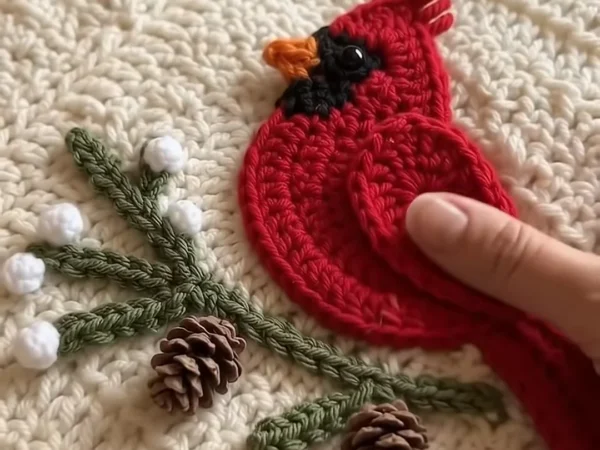
- Place the wing on the body with the tip pointing toward the tail. Sew it only along its upper half, from the front to the tip, so the lower half lifts free.
- Lay the blanket flat, RS up. Mark the cardinal positions with pins: 9 rows of 7 (63 cardinals) for a queen, or 6 rows of 4 (24 cardinals) for a throw, 28 cm apart across and 25 cm apart down, shifting every other row by 14 cm.
- For each cardinal, pin the sprig first, running diagonally under the body. Sew it down along the stem only, so the needles stay loose.
- Pin the cardinal so its belly sits on the sprig. Sew around the outline of the body and head with the red tail, catching only the top of the griddle bumps so nothing shows on the WS.
- Sew 2 pinecones at the lower end of the sprig and 3 berries near the tip, catching them at the base so they stand up.
Red Scalloped Border
- Rnd 1: with red and the 5.5 mm hook, RS facing, join in any corner. Ch 1, sc evenly around the blanket: 1 sc in each st along the top and bottom, 1 sc in each row end along the sides and 3 sc in each corner. Join.
- Rnd 2: ch 1, sc in each st around, 3 sc in each corner st. Count the sts on each side and add or skip 1 or 2 near the corners to get a multiple of 6 plus 1. Join.
- Rnd 3: ch 1, sc in first st, *sk 2 sts, 5 dc in next st, sk 2 sts, sc in next st; rep from * around, working 7 dc in each corner st. Join and fasten off.
Finishing
Weave in all the tails on the WS of each applique before you sew it down, except the one you sew with. When every cardinal is on the blanket, turn it over and check the back: any long floats should be caught down with a small stitch so fingers and toes don’t catch on them.
Lay the blanket flat, mist it lightly with water and pat the cardinals and sprigs into shape. Fold each wing up a little while it dries so it keeps its lift. Do not press the pinecones or berries flat. Let it dry completely before you use it.
Tips for Success
- Make the appliques in batches: all bodies, then all tails, all wings and so on. You will make 63 of each for a queen, and batching makes every bird the same size.
- Leave a long tail on every body; it is your sewing yarn and saves joining new red yarn later.
- Sew the face pieces (beak, mask, eye) on every body before you place any cardinal, so all the birds look in the same direction.
- Pin a whole row of cardinals and step back to check the spacing before you sew any of them down.
- Use a blunt tapestry needle and slide it under the bumps of the griddle stitch, not through them, so the stitches stay hidden.
Common Mistakes to Avoid
- A body circle that cups. Rnd 4 needs exactly 40 hdc; if it still cups, add 1 hdc in each of 4 spaced sts on the outline round.
- A head that leans. The 8 sts for Head Row 1 must sit centered on top of the circle, not to one side. Mark them before you start.
- A flat wing. Sew only the top half of the wing. If you sew all the way round, you lose the 3D look.
- Griddle stitch that slants. Always sc in a dc and dc in a sc; if two dc stack up, you have dropped a stitch.
- A wavy border. If the edge ripples, use 1 sc in every row end and skip 1 row end every 10 rows on the sides.
Ways to Customize This Pattern
- Make a cushion: work a 45 cm square of griddle stitch, add one large cardinal made with 2 strands held together and a 6.5 mm hook, then sew it onto a cream fabric back.
- Add a few brown female cardinals with a red crest, wing and tail for a pair on every other branch.
- Swap the cream base for soft gray or light sage so the red birds stand out even more.
- Make a baby blanket of 80 x 100 cm with 6 cardinals and no pinecones or berries, so there are no small 3D pieces.
- Use single cardinals as ornaments or bag charms: sew two bodies back to back with a little fiberfill between them.
Frequently asked questions
63 cardinals in 9 rows of 7, spaced about 28 cm apart across and 25 cm down, on a blanket of about 200 x 230 cm. A throw of 120 x 150 cm needs 24 cardinals in 6 rows of 4.
Not with this construction. The body is worked in the round and the wing has to stay loose, so the pieces are made separately and sewn on. It also lets you plan the layout before anything is attached.
The pinecones and berries are small 3D pieces that a baby could pull at. For a baby blanket, leave them out, embroider the eyes, and sew every piece down firmly all the way around, including the wing.
You probably crochet tighter than the pattern. Go up to a 5 mm hook for the appliques, or keep your hook and space the birds closer together, about 25 cm across instead of 28 cm.
Wash it on a gentle cold cycle inside a large laundry bag and dry it flat. Wash a scrap of red with a scrap of cream first, because bright reds can bleed into light yarn.